2D Character Controls in Godot (Sort Of)
I don't know how to set up 2D character controls in Godot. I'll just confess that right now.

I've tried, ladies and gents - I've drafted this same blog post four times, each time trying to approach the problem of 2D movement from a different angle - and every time, without fail, something has screwed up, and I've not been able to find a shred of information online on how to fix it.
October is a very busy month for me, and I'm already days behind on my monthly schedule, because I've been spending way too much time trying to figure out problems like why my character won't go up slopes or why they constantly jump in mid-air.
I've been watching several tutorials on the subject of 2D movement, but all of them approach it from a different perspective, which only ended up confusing me more. And honestly, I think if I tried to make a from-scratch movement tutorial here, it would only contradict all the other tutorials out there and confuse you even more.
But I'm a wannabe gamedev of my word, and I said that we were going to cover 2D movement in this post. So, I won't give you my tutorial on how to make a character move in 2D - I'll give you everyone else's.
Below I've copied down the methods of several tutorials I've seen on how to make 2D movement. I'm not going to pretend to understand how they all work, but it's like baking a cake - I don't know why we put flour into it or why we cook it a this precise time, all I know is I follow the instructions, and somehow, at some point down the line, I end up with a cake.
Hopefully by the end of this, I'll end up with a basic idea of what goes into 2D character movement. First of all, we'll look at one of Godot's own tutorials for how to produce 2D movement.
Method 1
The Input Map


A new window will open up, and at the top it will say "listening for input". Before you click anything else, type in whichever key you want your action to be mapped to - in my case it will be "D".

Godot will automatically select the key you just pressed as the one for the action to be mapped to. Now you can press OK.


Now Godot understands that when we press either D or the right arrow key, we're activating the "right" command. We'll decide what it is that command actually does in the code itself.

Now Godot understands that when we press either A or the left arrow key, we want to activate the "left" command.

Since these are all the directions we want to go in, we can now close the Input Map.
Creating a New Script

A new window will open up. In "inherits", I want to write the name of the node that this script is going to be attached to - in my case the CharacterBody2D node.


- The "ready" function (known in Unity as the "start method") is for code that happens at the very start of the game. Any code written in this section will happen once as soon as the object it's attached to first appears in the game.
- The "process" function (called the "Update method" in Unity) is for code that happens constantly throughout the game. Any code written here will be carried out once every frame. Since most games go sixty frames per second, this means the code here will be carried out sixty times every second - and it will do this over and over again for as long as the object it's attached to stays in the game.

Adding a Variable
@export var speed = 400
"Var" means "this is a variable, "speed" is the title we've given our variable, and 400 is the value we've given it. So now, whenever we type "speed" in the code, Godot will know that we mean 400 pixels per frame.

But what does "@export" mean? Putting this at the front of the code means we can access and change this variable's value at any time from the inspector. Without it, if we felt our speed was too much or too little, we'd have open up the code again and manually type in a new value every time we wanted to change it. By "exporting" it out to the inspector, we can just edit the value whenever we want in the CharacterBody2D's inspector menu on the right-hand side, where it will appear right at the top.

Adding New Functions
func get_input():
func _physics_process(delta):
"Func" means "this is a function", followed by the title we want to give our function.
Delta
But what is "delta"? Why is that at the end of our process and physics process functions? Well, "delta" is something that we put at the end of a lot of our code if it's for frame-based stuff. Unity calls this time.deltaTime, and it means the same thing here.

Vectors
var input_direction = Input.get_vector("left", "right", "up", "down")
"Var", we know, means "this is a variable", and we've called this variable "input_direction". Presumably, this means it wants to know the direction of our player's input - in other words, it wants to know whether we're pressing left, right, up or down (which we assigned buttons to using the Input manager).
But instead of assigning it a value, this variable has an in-built Godot command at the end of it: Input.get_vector. What does that do?
You know when you chart coordinates on a map and the result you get is two numbers in parentheses, like "(X, Y)"? This is called a vector - specifically, it's a Vector2, because there's two coordinates.
In a 2D game, all of our movement would be in Vector2s, since there's only two dimensions you can move in - left-and-right (X) or up-and-down (Y).
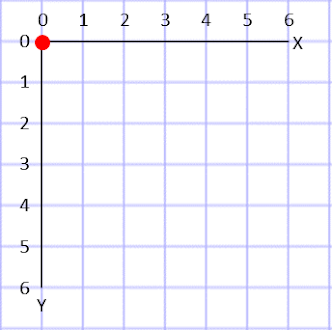
Say the red dot is where we are in a 2D game. If we want to go across, we can see that we have to keep adding positive numbers to our X value, and if we want to go down, we keep adding positive numbers to our Y. So, in order to do the reverse - to go left instead of right, or up instead of down - we have to subtract instead of add. This is how Godot understands axis-based movement: right is plus on the X, left is minus on the X, down is plus on the Y and up is minus on the Y.
Input.get_vector is a command that automatically gets our vectors for going left (-1 on the X), right (1 on the X), up (-1 on the Y) and down (1 on the Y). If we multiply this by our speed variable, we'll have our velocity - our speed in whichever of these directions we're going. We can type this into the code like so:
velocity = input_direction * speed
Velocity is an in-built quality of Godot object, so we don't have to make it into a variable.
Calling Functions in Other Functions
get_input()
...which if you remember, is just the name of our other function, the get input function. This is called "calling" a function inside of another function. Since we've called our get input function inside of our physics process function, the get input function will run whenever the physics process function runs - and since it runs constantly all the time, the get input function will run all the time too. This is just a way of tidying up the code - otherwise we'd be typing our whole "get vector" thing in the physics process function, and all that code could bloat it up and make it hard to read.
Underneath this, the tutorial puts something else, too:
move_and_slide()
Now, at the very bottom, the Godot tutorial has added one more line of code: "move_and_slide()". What is move-and-slide? ...I don't know. Genuinely; to me this is some kind of magic spell. It seems to be some kind of command that you attach to your CharacterBody2D that automatically makes it so you can move it around - and not only that, but also add collision detection to it, so it can land on platforms and other colliders without going through them.
I don't know what's going on with it, but I know that nothing will happen in play mode if I don't add move_and_slide at the end of my physics process code. And since I've been tried writing functioning movement code four times already to no avail, I'm not ready to start questioning it now.

Now our script is ready to be applied to our CharacterBody2D, if it isn't already. You'll find your scripts down in the FileSystem menu at the bottom-left (they'll be the ones with the gear icons next to them). Click-and-drag the name of the code you want to apply up to the CharacterBody2D's name in the scene menu above it to apply the code to the object.

Now, if you go into play mode by hitting the play button at the top-right of the screen, you can move your character up, down, left and right. Plus, thanks to the move_and_slide command, your character will bump into any collideable objects you might have in your scene.

Adding a Camera


extends CharacterBody2D@export var speed = 400func get_input():var input_direction = Input.get_vector("left", "right", "up", "down")velocity = input_direction * speedfunc _physics_process(delta):get_input()move_and_slide()
Method 2
The next tutorial that I've tried is Mina Pêcheux's "Implementing a 2D character controller". This is a more traditional side-scrolling character controller that allows the character to move left, move right, and jump. I've also combined it with her "Using input actions" tutorial since we've already covered adding input actions.
Now in the script we can move on to deciding the variables. In the gap at the top, we've added three variables:
- @export var moveSpeed = 150
- Our movement speed, which has been set at 150 pixels per second, and exported so we can edit it in the inspector.
- @export var jumpVelocity = 400
- How high we jump, in this case 400 pixels high (though we can edit this in the inspector as well since we've exported it).
- var gravity = ProjectSettings.get_setting("physics/2d/default_gravity")
- Our gravity value, which is a little different from the rest. If you recall, our CharacterBody2D is immune to the effects of in-scene gravity that rigidbodies are susceptible to, which means if we want them to come back down after they jump up, we need to set our own gravity variable for them. But here, instead of assigning a random value, we've gone into Project Settings and taken the default gravity setting using the code above, and have made that into our character's gravity value, so everything's consistent. We can't export this one out to the inspector - if we want to change the default gravity of our scene, we have to go into Project Settings to do so.

If Statements
Surely we don't need our crushing downwards force to be working all the time - only when the character is in the air. Or, to phrase it another way, if our character is on the floor, we don't want this gravity y-axis value to apply.
This brings us neatly to the "if" statement. This is a type of code that looks out for if something happens. We type down "if", and then next to it we type out what we want to check happens. Then, underneath the statement, we write down what we want to have happen when this first thing happens. All in all, it's laid out like this:
if (something happens):
(something else happens)
So, we want an if statement that checks if the player character is on the floor. Luckily, Godot has an in-built command that checks this called is_on_floor(). So we just type in "if is_on_floor()"...
...actually, no. We don't want to check if the player is on the floor here - we want to check if they're not on the floor. Funnily enough, writing that out is as simple as putting "not" after "if":
if not is_on_floor():
And underneath this we can put our downwards velocity code, so the whole thing looks like:
if not is_on_floor():
velocity.y += gravity * delta
So this code says "if we're not on the floor, our y-axis velocity goes up by our gravity value (because for Godot, down is plus) multiplied by delta (to keep it framerate-kosher)".
When we put a plus sign in front of a = sign ("+="), this is just Godot's way of saying "goes up by". If we were to put a minus sign in front of it (-=), it would mean "goes down by".

A Warning
At this point, I had a huge scare, and it almost made me give up on the tutorial. If you're sharp-eyed, you'll have looked at the above image and noticed I made a huge mistake.
Get Axis
velocity.x += Input.get_axis("left", "right") * moveSpeed
This code is basically saying "our velocity on the X axis goes up by left (-1) or right (+1) multiplied by our moveSpeed value (150)."
If Statements with Multiple "Ifs"
if Input.is_action_pressed("jump"):
velocity.y -= jumpVelocity
(Remember that "-=" means "goes down by".)
Now, if we try out our game...


Well, now we only jump once, but if I press the jump button again while in mid-air, the character will go even further upwards. It's like they're not waiting it hit the ground before they can jump again. We can fix this by adding another command to our if statement, the "is_on_floor" command, which we talked about earlier.
if Input.is_action_just_pressed("jump") && is_on_floor:
velocity.y -= jumpVelocity

It, uh... well, it works, but it's very floaty. The character doesn't fall down, they just leisurely float to the ground - maybe my default gravity setting is a little too low. Also, for some reason it hasn't actually fixed the whole "jumping while in mid-air" problem. It should, I don't think there's anything wrong with the code, but it's just as if Godot just doesn't recognize the tiles I've laid down as a "floor".
extends CharacterBody2D@export var moveSpeed = 150@export var jumpVelocity = 400var gravity = ProjectSettings.get_setting("physics/2d/default_gravity")func _physics_process(delta):if not is_on_floor():velocity.y = gravity * deltaif Input.is_action_just_pressed("jump") && is_on_floor:velocity.y -= jumpVelocityvelocity.x += Input.get_axis("left", "right") * moveSpeedmove_and_slide()
Method 3

func input() -> Vector2:
var inputDirection = Vector2.ZERO
So we've made a new variable for the function, called it "inputDirection", and assigned its value to be Vector2.ZERO (as in 0 on the X axis and 0 on the Y axis).
Now, since we've made our "inputDirection" variable into a Vector2, that means we've given it an X and a Y, just like with velocity. We can use this along with the "get axis" command we talked about earlier to turn this X value into 1 or -1 using our input commands:
inputDirection.x = Input.get_axis("left", "right")
All this means the whole "input" function, which we said will return as a Vector2, will return with either -1 if we're pressing left, or 1 if we're pressing right.
Normalization
Now, underneath this line, we've written this:
inputDirection = inputDirection.normalized()
What is "normalized"? It's a command that makes sure whatever Vector2 we get is always going to be either 1 or -1. This has implications for diagonal movement - if we were moving diagonally, then we'd be moving both 1 on the X axis and 1 on the Y. Problem is, 1 and 1 make 2, and Godot will actually add these two together in its vector calculations, meaning we'd be going faster diagonally than we would moving normally. "Normalized" just makes sure that this doesn't happen by keeping the overall result of the Vector2 at 1, no matter what's going into it.
Finally, we've added a line that says "return inputDirection" right at the end of our input function - meaning all the sums in the function will come together to add up to the Vector2 result we're looking for in the title of the function - either -1 on the X axis or +1.

Now we've created a new function, this time called "func accelerate(direction):". This function will be fiddling around with our acceleration variable. I'll try and explain why we put "(direction)" at the end of its name in a minute.
Move Toward
velocity = velocity.move_toward(speed * direction, acceleration)
"Move toward" - as it's being used here - is a command that takes one side of a Vector2 (and remember that velocity is itself by default a Vector2 in Godot) and moves it towards the other side of the vector by whatever sum we put in the brackets. So, for example, say we had a Vector2 where one of those vectors was 4 and the other was 8. "Move toward" would take the 4 and make into 8 by increments of whatever we put in the brackets - so if I put 2 in the brackets, Godot would keep adding 2 to the 4 until it turned it into 8.
In this case, the sum in our brackets is our speed variable (which is 550) multiplied by our direction (which will be either 1 or -1), then adding the acceleration variable to it (50).
I think what will happen is the velocity value we get from our Input Map (which thanks to "get_axis" is either 1 or -1) will be ramped up by our move_toward command adding the speed and acceleration values to it so the resulting movement is much faster.

Now we'll declare a new function called "add_friction". This function will, of course, deal with our friction variable. This one will also have a velocity.move_toward command, but it will be laid out like this:
velocity = velocity.move_toward(Vector2.ZERO, friction)
"Vector2.ZERO" here will just keep us moving in the direction we're already moving in (don't ask me how), and we add our friction value (which we set as 70) to it.

Now we'll make one more function that will bring all the above together to work out the overall player movement. And we only put one thing in here: "move_and_slide".

Now we go back to our physics process function. First thing we want to do is is get our input, so we'll create a new variable for this function, call it "inputDirection" (and since it's a variable inside of one function and not split across multiple functions, it's alright if we use the same name twice), and type it out like so:
var inputDirection: Vector2 = input()
If you remember, "input()" is the name of one of our functions. So, we've created a new variable, called it "inputDirection", made sure it's a Vector2, and made it so it equals our input function - or rather, the returned result of our input function, which will either be 1 or -1.
Does Not Equal (!=)
Underneath this, we'll write a new if statement, which will say if our inputDirection's Vector2 is not 0 (since that will mean we're pressing a button), we activate our acceleration function. How do we check to see if something doesn't equal something else? Instead of writing "=", we put an exclamation point at the front ("!") to turn the equals sign into what Godot recognizes as a "does not equal" sign ("!="). The whole if statement looks like this:
if inputDirection != Vector2.ZERO:
accelerate(inputDirection)
This translates into "if our inputDirection is not 0, activate the accelerate function, but turn that 'direction' in its brackets into 'inputDirection'". I think.
When that happens, we activate the accelerate function, meaning we take our velocity and ramp it up to what works out as either 550 (right) or -550 (left). I think.
Else Statements


...we can see that not only do we move left and right, but our character actually speeds up from their starting position to go left and right, and slows down to a stop when we let go of a button.
Double Jumps
const maxJumps = 2var currentJumps = 1

if Input.is_action_just_pressed("jump"):if currentJumps < maxJumps:
velocity.y = jumpPowercurrentJumps += 1
else:velocity.y += gravity
if is_on_floor():


...it works very well. The character can jump twice in the air, but that's all they can manage before they come back down. Sure, they jump a little high, but that's something we can edit to our preference by changing the gravity variable.
extends CharacterBody2Dconst speed = 500const jumpPower = -2000const acceleration = 50const friction = 70const gravity = 120const maxJumps = 2var currentJumps = 1func _physics_process(delta):var inputDirection: Vector2 = input()if inputDirection != Vector2.ZERO:accelerate(inputDirection)else:add_friction()player_movement()jump()func input() -> Vector2:var inputDirection = Vector2.ZEROinputDirection.x = Input.get_axis("left", "right")inputDirection = inputDirection.normalized()return inputDirectionfunc accelerate(direction):velocity = velocity.move_toward(speed * direction, acceleration)func add_friction():velocity = velocity.move_toward(Vector2.ZERO, friction)func player_movement():move_and_slide()func jump():if Input.is_action_just_pressed("jump"):if currentJumps < maxJumps:velocity.y = jumpPowercurrentJumps += 1else:velocity.y += gravityif is_on_floor():currentJumps = 1
Method 4

So, if we look at it through fresh eyes, we can see that the first thing the code gives us, other than the "extends CharacterBody2D" title, are three variables - two constants, one for speed and one for jump velocity, and one gravity variable.

And, if we try it out in play mode...

...it works just fine. Or at least as fine as I can expect.


Comments
Post a Comment