Today I'm going to take a look at coding a character for 3D movement. We'll look at how to basically make an object move in Godot, then we'll explore making it move in different directions.
Setting Up the Character
Let's just get right to it. I've opened up a new Godot scene. The first thing we'll create is our character.
Remember how scenes in Godot are all made of different nodes piled on top of each other? In the Scene Menu on the left of the screen, we can pick our first node. Which node do we want first? Well, since it's a 3D object we're making, we could pick "3D Scene" as our first node...
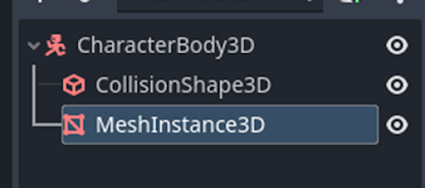
or, to be more specific, we can click "other node" and add in a CharacterBody3D node.
When we put the CharacterBody3D in, it will come up with a yellow exclamation mark saying that it wants a CollisionShape3D as a child of the node, so it can bump into other objects.
So, I'll right-click on the CharacterBody3D's name, click Add Child Node, and add in a CollisionShape3D node.
Now, of course, it wants to know what shape this CollisionShape3D is. We can decide this by going over into the CollisionShape3D's inspector on the right-hand side and clicking the empty slot next to "Shape" to give it one.
What shape do we want to give it? Well, usually in 3D games, characters have a capsule-shaped collider. This is so they have a curved bottom which helps them walk up steps or slopes. So we'll give our CollisionShape a New CapsuleShape3D.
So now we have our character and their capsule collision shape. Of course, we can't actually
see them because we don't have a mesh.
In the scene menu, I'll right-click my CharacterBody3D, select Add Child Node, and add to it a MeshInstance3D.
Still nothing will show up, so with the MeshInstance3D selected I'll go into the inspector menu and click the empty slot next to "Mesh" to give it a specific mesh. Since we're using a capsule-shaped collider, I'll give the character a capsule-shaped mesh.
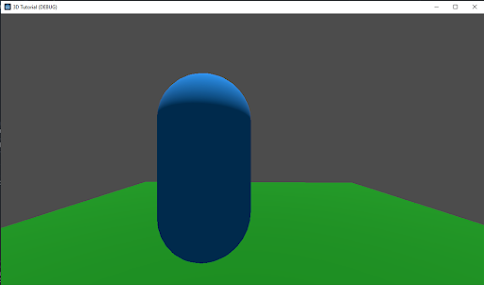
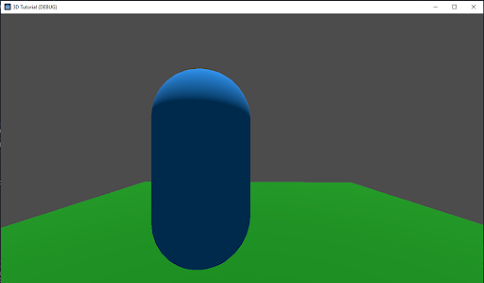
Now we can see the character in the form of a white capsule.
Every mesh in Godot starts off as plain old white, so I want to give this mesh a new material to change its color and keep track of it. In the mesh's inspector, there's a section called "Surface Material Override". Click on it, and an empty slot opens up we can put a new material in. I'll add in a New StandardMaterial3D.
A white circle will appear in the inspector. If I click it, go down to "Albedo" and then click on the white button next to "Color", I can change the color of the material, and in turn the character mesh.
Here I've changed the mesh's color to blue so it will stand out more.
One more thing - I want to keep track of where my character is facing, so I've added another mesh as a child node of the CharacterBody2D. This time I've made it a cylinder, rotated it 90 degrees, and have scaled and moved it roughly where I imagine the character's eyes would be. In this 3D Godot project, "forward" is where the blue arrow is pointing.
I've also re-named both meshes to tell them apart, calling the blue capsule mesh the "body" and the white sideways cylinder the "eyes".
Now I've made another scene for the level itself: it starts with a simple 3D root node, and inside I've added a box mesh with a green material, stretched it out, added a StaticBody3D to it (which is like a RigidBody except it doesn't move) and added to that a CollisionShape3D.
If I go down to the FileSystem menu at the bottom-left, I can see all of my created scenes. If I click and drag the name of my character scene into the viewport, I can add my character and all of its properties to the level scene.
I've also added a Camera3D and a DirectoinalLight3D, just so we can see everything when we enter play mode.
Making an Object Move with Code
In the FileSystem Menu, I've right-clicked and selected New Script to create a new code script. I've made it inherit the CharacterBody3D node, used the Node:Default template (since it's the one I'm most familiar with) and called it "3d_movement".
We've talked about the layout of the scripting window in our look at 2D controls, but to re-iterate, our code is currently split into two "functions" (segments): the "ready" function and the "process" function. Code typed in the "ready" function happens once as soon as the object the code is attached to spawns into the game, while code typed in the "process" function happens once every frame - in other words, it happens constantly throughout the game.
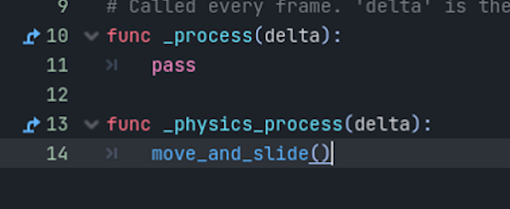
I'd like to add a new function underneath these two called the "physics process" function. This function works the same as the process function, except it's a little better at handling physics, which we'll be using since we want to do movement. This is typed as:
func _physics_process(delta):
The "delta" at the end of the process and physics process functions is something we put at the end of a lot of frame-based code that makes it so the game runs at the same speed on every computer. Since some computers are faster than others, they go through more frames a second, which might mean the code that's carried out once every frame (process and physics process) activates too frequently and makes the game run too fast. Meanwhile, a slower computer might play out the code a little too slow since it's going through less frames a second. Adding "delta" at the end of our framerate-dependent commands makes sure the code goes at the same speed on any computer, fast or slow.
Now, to make our character move, let's go right back to basics: let's say we want our character to just move forward - we don’t want to control them right now, we just want them to move on their own.
From what I've seen, Godot has its own simple command that handles all the movement you could want: move_and_slide. This is sort of a sub-function of its own, that contains all the code and maths necessary for movement, so you need only call it inside of your physics process function to enable movement for your character. Not only that, but it also allows your character to slide up slopes and be carried along by moving platforms.
In the physics process function, I'll just type this in:
move_and_slide()
Of course, if I were to press the play button now, the character wouldn't move anywhere, because while it's now capable of moving, we haven't told it where exactly we want it to move. Move_and_slide can make it move just fine, but what it needs first is a velocity vector.
A "vector" is movement along an axis. In a 3D space we have three axes - the X axis (left and right), the Y axis (up and down) and the Z axis (back and forth). Everything we put in our 3D game can be given a set of coordinates to indicate where it is - in fact, if you grab an object in your game and move it around, you can see in the bottom-left of the viewport the new coordinates that you're moving it to.
Notice how the value of the coordinate goes up in a positive direction if you move it one way across an axis, and goes down into the negatives if you move it the other way.
Here's a diagram to explain how it is Godot views the 3D directional axes:
(If you remember our 2D tutorial, you'll remember that up was minus and plus was down. That's not the case in 3D - they swap around so plus is up and minus is down. If you're in doubt which direction you want to go in, take a look at the bottom-left of the viewport while moving around the object to see which positive and negative coordinates correspond to which position)
Why is this important? By taking our object's velocity (which is an in-built attribute of it, and the one our move_and_slide command wants to know) on one of these axes and adding to or taking away from it, we'll be telling move_and_slide to take our character in one direction, or the opposite, on that axis.
So, for example, let me go into the physics process code and, above move_and_slide, type in this:
velocity.z = 1
And if I press the play button in the top-right to enter play mode (or press F5)...
...our character goes floating off ahead of us.
What's happening here? Well, "velocity.z" is our velocity on the Z axis. Remember velocity is the thing move_and_slide is looking for. When it gets this velocity, be it on the X, Y or Z axis, it will move our character by that velocity on that axis. We've told it that our velocity on the Z axis is equal to 1: meaning it will move our object +1 up this axis every frame (since we're in the physics process function).
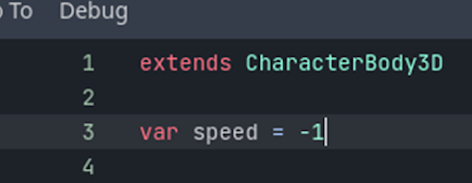
Like we said, positive numbers in 3D Godot mean forward, right and up. What if we want to move our character backwards instead? Then we use negative numbers: to demonstrate, I'll change my "velocity.z = 1" sum to this:
velocity.z = -1
Now when we enter play mode to see what happens...
...we can see our character is now going the
other direction - they're going
down along the Z axis instead of up, sending them backwards.
Variables
Now that we understand basically how moving an object works in Godot, we can start doing more dynamic things with it. For example, instead of writing a value every time we want to change the velocity, we can turn that value into a variable.
"Variables" are like names that we can give to certain values - instead of writing out that value over and over again in the code, we can just write this name. Also, if we want to change this value, we just need to change it in the variable and it will update across the whole script.
When we make variables, we usually type them out at the very top of the script, before the ready function and underneath the "extends CharacterBody2D" line (which just tells us what node this code is attached to). In this area, I'm going to type in:
var speed = 1
"Var" means this is a variable, "speed" is the name we've given this variable, and "1" is the value that I've given it. This means whenever I type "speed" in the code, Godot will take that to mean "1".
Now, back in the physics process function, I'm going to take my velocity.z calculation and replace the "1" with "speed".
And if we try it in play mode...
...it works just the same as before, with our character going forward at a steady speed.
Now, if you go back up to the speed variable in the code and change its value to, say, 100...
...go into play mode and the character will go flying off at an increased speed. This is because when we change the value of our speed variable, it copies that value everywhere we put "speed" in the script.
And similarly, if this time we change our speed variable to -1...
...our character will move backwards, since it's now going in a negative direction along the Z axis.
One more thing we can do with our variable is export it. It can be a hassle to constantly go back into the script to change the variable every time we want to do so - if we export it, Godot will let us change the variable on-the-fly using the inspector.
In front of our speed variable, type in "@export".
Now if you switch to 3D edit mode (using the four tabs at the top of the screen) and select the character node, in the inspector menu there'll be a slot that contains our speed variable. You can click the up and down arrows next to it to increase or decrease its value, or you can click on it directly to type in a value of your own.
Input Directions
So now we know how to move our character and we know how to use variables - now we want to make it so our character only moves when we're pressing a button.
In Godot, we can decide which button does which thing by assigning these buttons names in the Input Map. We've been over the Input Map before, but we'll revisit it briefly here. To access the Input Map, go up to Project in the top-left, then click on Project Settings. At the top of the new window that comes up, there'll be a few tabs to pick from - the one we want is the Input Map tab.
At the top, you'll notice a bar that says, "Add New Action". If you click it, you can type in the name of the new action you want to add, like "forward" for example, then press the button that says "Add" beside it to add it into the Input Map.
Now we have our action, we need to assign buttons to it. To do this, we press the plus button beside the name of our action in the list, and in the new box that comes up, we type in the button we want to use for our action. If we click the plus button again, we can add another button to this action, like I've done below:
Here I've added an action called "forward", and have used the plus button to assign two keys to it - the "W" key and the up-arrow key.
In Godot, there's a selection of commands called "Input" commands we can type in our code that allows us to access these input actions. What this means is, whenever I type "forward" into one of these input commands, the code will look out for whether we're pressing the W button or the up-arrow key.
(By the way, you might notice a switch near the top-right of the box labelled "show built-in actions". Godot already has a few actions assigned to some buttons of its own. You can flip this switch to see them if you'd like to use them in your code, but I find it simpler to make my own.)
Using the same method as above, I've added in all the other direction-based actions I think I'll need - W and up for forward, S and down for backward, A and left-arrow for left, D and right-arrow for right.
If Statements
Let's look at one of these "input commands" right now. If we want to see whether our "forward" command is being activated (i.e. if the player is pressing either W or the up arrow) we can use this command:
Input.is_action_pressed("forward")
This input checks for whether the player is activating one of our actions by pressing its assigned button - in this case, it's looking for "forward", so it'll be looking for the player to press either W or the up arrow.
How can we use this to make it so the character only moves forward if the player is pressing one of these buttons? Well, one way of doing it is by using an "if" statement. An "if" statement checks to see if something happens, and makes something else happen when this first thing happens. In code, the if statement is laid out like this:
if (something happens):
(something else happens)
In an if statement, the code next to "if" will represent what needs to happen in order for the statement to be activated. The code indented beneath it will be activated when this first "if" code is satisfied.
In our case, we want to check if the player is pressing one of our "forward" buttons (which we can do with out Input,is_action_pressed command). If they are, we want to change our velocity on the Z axis to our speed variable. So, the full if statement would look like this:
if Input.is_action_pressed("forward"):
So our code will check if one of the forward buttons is pressed, and if it is, then it will change the character's Z velocity value to match our speed variable - this of course, will give our move_and_slide function the velocity vector it needs to move the character.
So, if we now go into play mode to test it...
...our character only goes when we press W or the up arrow... and they keep going... and they never stop.
Hmm. There are probably several ways of fixing this, but I think it would be easier to try a different approach. Instead of using an if statement and hard-setting the velocity itself so it becomes the speed value, maybe we should keep the velocity at zero and pile the speed value on top of it instead.
Get Axis
We can do this with the "Input.get_axis" command. The Input.get_axis command takes in two values - the first one it turns into a negative, and the second it turns into a positive.
That sounds quite a lot like the way Godot handles directional axes we talked about earlier. One side of an axis is negative (left, down, back) and the other side is positive (right, up, forward).
If we go back and look our our Input Map, we can see not only which actions could correspond to which axis, but also which side of the axis it's on, positive or negative. For example, we know "forward" is be positive on the Z axis... so that would mean "backwards" would be negative on the Z axis. So we could use our "backward" action as the negative value for our Input.get_axis command, and our "forward" action as our positive command. The command as a whole would look like this:
Input.get_axis("backward", "forward")
So, what do we do with this? Well, we want this to represent our velocity on the Z axis. So, we can just set this as our Z velocity by making it equal velocity.z:
velocity.z = Input.get_axis("backward", "forward")
But of course, positive 0 and negative 0 are both 0. The character now knows what direction they're going in, but they don't know at what speed - so we'll multiply our speed variable into this command. It will ultimately look like this:
velocity.z = Input.get_axis("backward", "forward") * speed
So what this code is saying is our Z velocity will be multiplied by our negative speed value if we're pressing backward, and our positive speed value if we're pressing forward.
While we're here, we can actually do our side-to-side movement in the same way. Side-to-side movement would be on the X axis, so we'd be messing with our velocity.x. For Godot, to go left is negative, and to go right is positive, so our negative get_axis value would be our "left" action and our positive would be our "right" action. Multiply the result by our speed variable, and we'll have
another velocity vector the move_and_slide function can use.
We can put this next get_axis command right underneath our first one:
velocity.x = Input.get_axis("left", "right") * speed
Since we don't need our "if" statement now, we can delete it if we haven't already. Then, if we test what we have in play mode...
...not only can we go forwards and backwards, we can also go left and right. And there you have it - very quick, very easy, very functional 3D movement in Godot.
Gravity and Jumping
Oh - right - I've just noticed that our character is floating in mid-air. Now, Godot does have its own in-built gravity force, but it only works on objects with rigidbodies. Since we didn't give our character a rigidbody node, that gravity force won't work on them. We'll have to give them their own sense of gravity in the code.
What is gravity, anyway? Well, it’s a constant down-going force. For 3D Godot, that will be a constant negative force on the Y axis. So, we can start by making gravity a variable, then we can make it so our character is constantly going downwards on the Y axis by that gravity variable.
The default gravity value for 3D Godot is 9.8, but if we want to be more specific, we can type out the following as a variable:
var gravity = ProjectSettings.get_setting("physics/3d/default_gravity")
This makes our gravity variable the same as the scene's default gravity value, and it also makes it so if we change this default gravity value (which we can do from the Project Settings menu), the character's gravity variable will change with it.
So, then, in the physics process function, we can type down that velocity.y should equal our gravity variable, and that should keep it on the ground, right? So we just write that down and test it in play mode...
Whoa! Why are we going up? Well, remember how the default gravity is 9.8 - that's a positive number, and for 3D Godot, positive means going up.
But we don't have to change the default gravity to -9.8 - instead of typing that velocity.y equals our gravity value, we can take that gravity value away from the velocity by changing the "=" to "-=":
velocity.y -= gravity
"-=" is basically Godot's way of saying "go down by". So we're saying our velocity on the Y axis should go down by our gravity value. If we were to type "+=" instead, that would mean "go up by", and our Y velocity would go up by our gravity value.
If we try it in play mode, we can see that it works, but... is it me, or does our character feel a little slower?
That going-down force on our Y velocity is constant - so our character is always being pushed down by this huge force, which might make them a bit hard to move. Surely we don't need this force of gravity pressing down on us all the time - only if we're in the air.
To address this, we can put our gravity code into an if statement. There's a special condition that if statements can have called "if is_on_floor". True to its name, it checks to see if our character is touching the floor. If we slot in our gravity code underneath this if statement, it will make it so our gravity only pushes down on us if we're touching the floor...
But, of course, we want the opposite. We want our gravity to kick in only if we're not on the floor. That's why after "if" and before "is_on_floor", we can put the word "not". This will turn it into "if not is_on_floor", which will check for just that: it will look to see if our character is not on the floor, and apply our gravity code only when they're in the air:
But if we try it in play mode, it still feels a little weird. What are we missing?
You remember the delta? The little thing we add at the end of our physics-based stuff to make sure the framerate is alright? Well, that's what we need to add here - or rather, that's what we need to multiply our gravity variable by - gravity being a physics-based feature and all. So our full if statement actually wants to be:
velocity.y -= gravity * delta
This may seem arbitrary, and it took me a while to figure out myself, but once you switch on play mode, you'll definitely notice the difference. Now the character realistically falls off the edge of the platform, instead of just disappearing when they get to the edge like without the delta. The framerate of my computer was too fast for the game to keep up - delta helps it reign itself in.
While we're here, now's a good time to look at making our character jump. First things first, let's go into the Input Map and add an action for "jump", and assign it to the space button.
Now let's make another variable for our jump force. Let's export it with an "@export" at the front and make it, say, 5 for now.
Now, jumping involves taking our position on the Y axis and setting it to our jump force variable. This takes another if statement, but it's a different kind of if statement than what we're used to - we actually want to check two things with it. We want to check if the jump button is being pressed,
and we want to check that our character is on the floor (otherwise, they could just keep exponentially jumping in mid-air off into space).
Fortunately, we can make a single if statement check for multiple conditions by putting two ampersands ("&&") between the conditions. Our conditions will be Input.is_action_pressed and is_on_ground. So, we'll put this into an if statement like this:
if Input.is_action_pressed("jump") && is_on_floor():
And underneath that, we can put a command that takes our Y velocity and makes it equal our jump force variable:
velocity.y = jumpForce
Now if I go into play mode and press space, the character will jump. But if I hold the spacebar, the character continuously hops in place - which you might want if you're playing as a bunny, but I'd rather they only do the one jump per spacebar press.
Input.is_action_pressed is a command that looks at whether the action key is held down - so it will carry out the Y velocity jump force command for as long as its pressed down. We want it so it only carries out this command once - so this time we use a different input command. This time we use the "Input.is_action_just_pressed" command. "is_action_pressed" checks to see if the player is pressing and holding a button, while "is_action_just_pressed" only checks if they're just pressing the button:
if Input.is_action_just_pressed("jump") && is_on_floor():
Now if we try it in play mode, the character jumps once every time we press the space bar, and won't jump again until we press it again.
Here's what the whole code looks like so far, if you'd just prefer to copy-and-paste it into your own script:
@export var jumpForce = 5
var gravity = ProjectSettings.get_setting("physics/3d/default_gravity")
func _physics_process(delta):
velocity.y -= gravity * delta
if Input.is_action_just_pressed("jump") && is_on_floor():
velocity.z = Input.get_axis("backward", "forward") * speed
velocity.x = Input.get_axis ("right", "left") * speed
This is a good starting point for understanding movement in Godot, but unfortunately, it's not perfect: the character doesn't turn to face the direction they're going, we can't spin the camera around and we can't make the character go in the direction the camera's facing.
Most 3D games are split into either first-person and third-person views, which all involve moving the camera around and sending your character off in its direction. This involves an extra step where we calculate what direction we want the character to move in. I won't go into detail on these things now, because I think this blog post is cluttered enough as it is. Plus, being real, I don't quite understand how to do it yet.


Comments
Post a Comment