Making a TileSet for Godot
While working on my write-up for 2D character controls, I hit a snag - I didn't have anywhere to actually put the character to test their controls. For a 3D test, I would've just put in a plane mesh for them to walk on or something, but in 2D everything visible is a sprite, and there's just no way I or anybody else is going to hand-draw every little platform in the game one-by-one - which is why God gave us tile sets.
Tiles are the literal building blocks that the stages of every pixel-looking game are made out of. They're little squares that are copy-pasted all throughout the game to form floors, walls and the like.

Drawing a Grass Tile
As far as I know, video game tiles in terms of pixel size are always some kind of multiple of eight – 16 by 16, 32 by 32, something like that. I began with just a simple 16 by 16 canvas in Photoshop.
Tiles are obviously quite small, so I used the pencil tool and decreased its size to just 1 pixel to draw out the tile. I've never done pixel art of any kind before, so be warned it looks quite awful.
The first thing I did to create my first tile was to draw a layer of green grass on the top, going about a third of the way down. The only real rule is that the drawing should look the same on the very far left as it does on the very far right, so the tiles all blend into each other when you put them together.

Then I changed my pencil's color to brown and filled out the bottom half of the tile with brown mud.


I've also added some even-lighter-green highlights on top of some of the light-green highlights, to make the highlights look more highlighted.

Now I’m going to add some shadow where the grass meets the dirt by using a dark bluish-green (and it’s bluish because shadowed things tend to be blue-tinted).

I’m also going to add a darker brown where the grass meets the dirt to form a dirt-shadow.
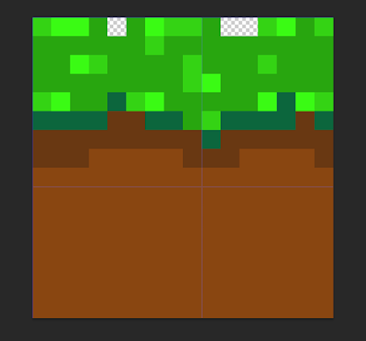
And finally, because I don’t feel like painting little flecks in the dirt, I’ll grab the brown part with the rectangle tool, go up to Filter in the top toolbar, then to Noise, then pick Add Noise. Adding noise to something gives it a grainy effect. I think just 1% more noise will do.

The Tile Atlas
Now I’ve created another Photoshop file – this time it’s 128 by 128 pixels.

If I grab my grass tile with the move tool and move it into this new file, it will show up smaller here. There's no need to change its size.

Every time we create a new tile for our game, we’ll click-and-drag it in the same way over to this big file. This will be our “Tile Atlas”, and will contain all the tiles we want to use in our game. Once we're done, we'll save this tile atlas as a PNG and put it in the folder we're making our game in.
Making a Corner Tile
My next tile is going to be a corner tile. I’ve noticed that the grass is six pixels from up to down at the edges – so on a new layer, at the new edge I’m making (on the bottom), I want to draw six green pixels going sideways.

I’ve made a curve to link the far sides together and filled in the dirt on the edge with green.

I’ve added some new grass shadow to follow along the curve (and gotten rid of it where it’s no longer needed).

Ditto for the dirt shadow – since it’s going two pixels down on one end, it needs to go two pixels across on the other end.

Using the same method as before, I’m going to add some highlights to the grass, then add some highlights to the highlights.

And if I click and drag this corner tile into our Tile Atlas, you can see it blends in with our other tile piece quite seamlessly.

Adding Tiles into Godot
Using the same methods above, I've made a slope model and a solid dirt model and put them in the tile atlas. By saving the tile atlas as a PNG into our game project's file, we can convert it into a tileset and paint these tiles all across our stage.
I’ve opened up a new scene in Godot and made it a 2D scene with a 2D root node.

As a child of the root node, I’ve added a TileMap node.

This new TileMap node is empty right now. If I go into the inspector and click where it says <empty>, I can add in a new TileSet.

An orange grid will appear in the middle of the viewport.

Nothing other than this will happen unless you click again on the TileSet sign we've just created in the inspector. This will switch the mode of the bottom screen into TileSet mode, where we can add our Tile Atlas.

If you've saved the Tile Atlas PNG inside the Godot project's folder, it will appear in the bottom-left FileSystem menu. Click and drag it from there into the empty box on the left of the TileSet menu.


The picture will show up in a grid, sectioned into squares. I'm lucky enough to have each picture fit in a square right away, but if it looks too big, you might have to change the Texture Region Size, which can be found in the menu next to the tiles that says "Atlas".

If you click on an area in the tile picture, that area will become highlighted, meaning you can "paint" it into your Godot scene along the orange grid. You can paint your tiles onto the screen by switching to TileMap mode at the bottom of the screen.

I noticed a couple of my tiles were a bit cut-off, so I moved them directly underneath the first tiles in my Photoshop tile atlas and re-saved it in my Godot folder. It automatically updates the TileSet when you do this.

Making a Slope Tile

Huh... you know, these slope tiles I made don't look nearly as good as they ought to. I'm going to go back and create a new one.
In my Photoshop tile map, I've used copy and paste (CTRL+C and CTRL+V) to create three grass tiles and laid them out in a row with the last one below the other two. The middle grass tile I'm going to make into my slope tile.


With this new, slightly smaller and lower grass tile, I'm going to do the same thing again, rectangle-selecting every part of the tile except for one column of pixels at the front, then hit CTRL+T to bring the rest of the shape down.

At this point I'm sure you can see what I'm doing here. I'm gradually lowering the tile down piece by piece, leaving one column of pixels behind each time, until it reaches the grass tile at the bottom and forms a slope.


Now I've added some extra dirt underneath the slope, so it forms a block with the lower grass tile.


So, what I've done here is actually created two more tiles - one for the slope itself, and one for the patch of ground underneath the slope.
When I went back to check, I noticed the new dirt tile was one column of pixels shorter than the other tiles. This is an easy fix - I just drew an extra brown column on its left side.

Now I've lined it all up and re-saved the tile atlas in my Godot project folder, I can finally place down a slope that looks more natural with these two new tiles.

In the inspector, you can change the Physics Layer a tileset is one if you want to move it into the background or foreground (you might want to do this if you've made tiles for sky, for instance).
If there is a way of rotating tiles inside of Godot, then I don't know what it is. I think you have to make copies of the tiles in the tile atlas and rotate them yourself, which is easy enough to do by hitting CTRL+T and dragging around outside the edges when the little curved arrow appears.
Next time we can finally look at coding by creating a character sprite scene, putting them into a scene with a tilemap and making them move around it.
Comments
Post a Comment