Making a Basic 2D Platformer in Godot

Anyone going into games development for the first time in the past few years will have heard of Brackeys - back when Unity was the indie dev's weapon of choice, the Brackeys channel contained some of the most intuitive and comprehensive tutorials for the engine on the Internet. What it had, and still has, over many tutorials out there is quite simple - it explains things in basic English. I can't tell you how many times I've opened up a tutorial just to have a bunch of words thrown at me that mean nothing to someone who hasn't touched the engine before (which I have in the past, but not without a ton of mistakes and misunderstandings). It's one thing to just copy down what someone else is doing, but if you don't understand it or how it works, you're not going to be able to make your own game because you're not going to know what's going on or why things fit together this way.
Brackeys retired his channel in September 2020, but like an Arthurian legend he returned to us in our hour of need about a year ago, this time to sprinkle his brand of magic on the Godot engine. In the wake of Unity's installation fees fiasco, many wannabe game devs such as myself turned to Godot as a new development tool. Unity, being a public company, is more or less at the mercy of the stock market, and liable to make rash decisions whenever traders start pulling out and the money starts to plateau (e.g. the aforementioned installation fees disaster). The exciting thing about Godot, meanwhile, is that it's open source, which means anyone can come along and modify it in a way that suits them. The result is a near-democratically owned software accessible to anyone; much like Blender, the game dev's trusty sidearm.
A hard truth I've seen new creatives grapple with when they're pitching their ideas, in whatever field they're going for, is this - you can't get the job until you get the experience, and you can't get the experience until you get the job. In other words, the only way you can prove to whoever you're pitching to that you can make a movie, cartoon or video game... is by making a movie, cartoon or video game.
So, I've followed along Brackeys' first (and so far only) 2D platformer tutorial, and wrote down the results here. It isn't as eloquent as Brackeys' own video, but it's mostly for my own benefit - these are just notes I've taken I can refer back to in the future.
Assets
"Assets" are things that you use to make your game - not the code itself, but things you can add code to. Stuff like sprites, models, textures, sounds and music. They're the "ingredients" you use to make your game, with Godot itself being the cooking pot you throw them into.
But when we talk about assets, what we're usually talking about are assets that other people have made and put up on the Internet for others to download and use. Brackeys, for example, uses in his video a pre-made collection of sprites and sounds downloaded from this webpage.
In a finished product, I'd want to use assets I created myself (or hired people to create for me) in Photoshop or Blender and whatnot, but for now I just want to see if I can make a functional game, so I'll just download those same assets from the website above and build my game out of that.
After downloading the assets, we can open up a new Godot project. Remember Godot has a kind of weird way of opening new projects - it wants you to create an empty folder in your documents first, then assign your new project to that folder.

Right-click in the file window and select "New Folder" to create a new folder were we can put all our assets. Give it a name that's something like "assets".

Now you can click-and-drag the assets you've downloaded from their folder into the new Assets folder you've created in Godot.


You can put scenes inside of other scenes as well - so you could put a character scene, an enemy scene and a collectable scene altogether in one big level scene. Essentially a Godot game is one big scene made up of other little scenes, and those scenes can be made of even littler scenes themselves, all nested in each other like one of those little Russian dolls.

Game Scene

From the scene menu in the top-left, you can decide whether your scene will be a 2D scene, a 3D scene or a piece of user interface. There's also "other node", where you can pick for yourself any of the nodes in Godot to make the first node. Nodes in general are split between 2D and 3D nodes, so you pick "Other Node" if you already have an idea of which specific node you want to start off with. If you don't have anything in mind, you can just start with one of the above - in our case we'll pick "2D Scene", since all our game assets are 2D.


To test out your game in play mode, press the play button up in the top-right of the screen or press F5. The first time you do this, Godot will ask if you want to make the current scene the "main scene" - the one the game will play from. Hit "Select Current" to make the current scene the main scene (or, if you want another scene to be the main one, press "Select" to choose one from your folder).

Of course, when you run the scene nothing will happen because we haven't put anything in it. If you hit the X button on the running game window or hit F8 to go back to Godot, the only thing that will have changed is that, if you look at the file menu, you'll see the name of your current scene will have turned blue, indicating it as the main scene.

Player Character Scene

As before, the first thing we pick is the root node. Since this is another 2D scene, we could pick the "2D Scene" option like we did last time... but there is a more specific node we can pick that serves as a basis for 2D characters. Click "Other Node", then type in the search bar that comes up "CharacterBody2D".

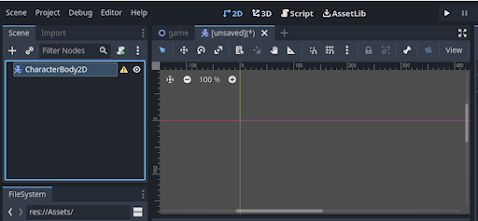
The CharacterBody2D node shows up at the top of the scene menu. However, nothing shows up in the viewport. This is because the CharacterBody2D node is invisible and doesn't look like anything until we add another node - a graphics node - on top of it. To add a new node to the scene, either click the plus icon in the top-left of the scene menu, or hit Ctrl+A for add.

Animated Sprites

On the right-hand side of the screen, you'll notice the inspector menu. This is where we can change some of the properties our currently-selected node has. It is here, for example, that we choose what picture(s) we want our Animated Sprite node to display.

With the AnimatedSprite2D node selected, where it says "Animation" in the inspector, click on it to open a drop-down menu. The first option is "Sprite Frames", and this is where we choose what images to use for our animation. Click the arrow next to where it says "<empty>" and select "New SpriteFrames".

At the bottom of the screen, a new window should show up allowing us to pick and edit the sprite frames. If it doesn't show up, try clicking on the newly-added SpriteFrame icon in the inspector.

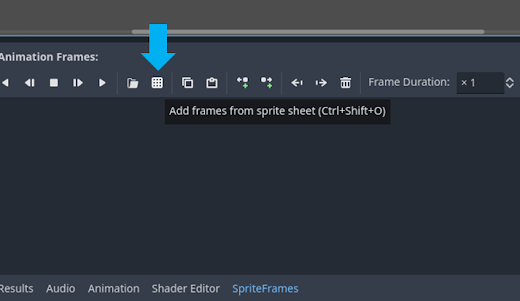
Along the top of the animation window, there's one icon that looks like a waffle. Click on this, or hit Ctrl+Shift+O, to add in a sprite sheet to cut frames from.


Let me explain - instead of having to clog up your files with image after image of different animation sprites, most game engines let you draw all of those images on one piece of paper, then pick out some of those images to play in a sequence. This is called a "sprite sheet", and you usually have one sprite sheet for each animated object containing all of its images, usually grouped by animation.

Click on "knight.png" and you'll see what I mean. All of the knight's animation frames are on this single sheet, grouped by what kind of animation they depict - and idle animation, a running animation, a roll animation, a getting-hit animation and a death animation.

Godot decides which of these images makes up one frame by placing them all in a grid - each box in the grid should contain one sprite. Now, the grid we have here is obviously way too big, since it can fit four sprites in one box. This is a four-by-four grid - and the sprite sheet was made to be eight-by-eight.

You'll see that the grid now neatly fits every individual picture into one box.

Now it's time to make our first animation. To make an animation, you click on each sprite you want in the order that you want it. To start with, we'll make an idle animation, so we'll click on the four sprites next to where it says "idle", one at a time, from left to right.

You'll see the sprites light up with the numbers from 0 to 3, showing the order you clicked them in and thus the order they'll be played. If you mis-clicked, click on the sprite again to take off its number and remove it from the animation.

Back in the viewport, you'll see that our character has been added - its sprites have been added on top of the CharacterBody2D node's location. Hit F to focus on it and zoom in on it with the mousewheel.


Now the image should look at lot more clear.

Now, let's test out our animation. First, make sure the AnimatedSprite2D is selected in the scene menu, so the sprite frames we selected show up in the bottom animation menu. Then, click on the play arrow in the upper-left of the menu to preview your animation.

If all goes well, we should see our knight bob up and down in the viewport. All its sprites should be appearing in the order they show up in the animation menu underneath.

If you want to increase the speed of your animation, you can click where it says 5 FPS (frames per second) to change its value. The higher the number, the faster it goes.

Double-click where it days "default" to rename your animation.

The button in the top-left-middle, the one that looks like an A inside of an arrow, is the Autoplay on Load button. Activating this makes sure the idle animation plays from the moment the game starts.


Collider Shapes

To add a new node, either click the plus icon at the top-left of the scene menu or hit Ctrl+A. In the menu that comes up, look up "collision shape" in the toolbar, and select CollisionShape2D when it appers.

If we look up in the scene menu, it's still complaining, this time about two things: number one, we've accidentally put it under the AnimatedSprite2D, where it'd rather be under the CharacterBody2D node. This is a simple matter of clicking-and-dragging the CollisionShape2D node under the CharacterBody2D node in the scene menu.

The second thing is that it wants to know what shape the CollisionShape2D is. We can decide this in the inspector: next to where it says Shape, there's an <empty> box with a drop-down arrow next to it. Click on this arrow to pick from one of the collider shapes available to the node. In this case, we want a New CircleShape2D.

A blue circle will appear in the viewport. Drag its centre to move its position, and drag the red dot on its edge to change its size. Try and make it so it fits inside the knight - it doesn't matter if it doesn't fill them up completely.

Now's a good time to rename our CharacterBody2D node to "player" and save our scene.
Nesting Scenes

2D Camera

Hit Create, and a big purple box will appear in the viewport - one that's way too big for our character.


Adding a Script


In the folder menu, like before, I'll right-click to create a new folder, call it "Scripts", then save my new script into this folder.

Now, since this node is a CharacterBody2D, it comes with a built-in script template we can use instead of writing out whole lines of code for ourselves. With the "CharacterBody2D: Basic Movement" template selected, you can hit "Create" to generate this new script.

Once we do, we get this block of code. Now, we have actually gone over this code before in a different blog post, but for a newcomer this kind of code (and indeed a lot of player movement code in general) is going to feel way too complicated (it certainly was for me). For now, we'll just leave it as it is.

Tiles


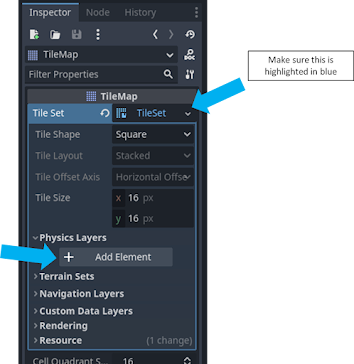
The first thing the tile map needs is a tile set to draw from. In the inspector, next to where it says "Tile Set", click on the <empty> box and select "New TileSet".

An orange grid will appear in the viewport, showing where we can put our tiles. These tiles are currently 16x16 pixels, which is fine for what we want to use. If you want to change the size of these orange tiles, click on the box that now says "TileSet" where it used to be "<empty>", so it's highlighted in blue. More options should appear underneath it.

At the bottom of the screen, a new tile menu will appear. It will tell us that it doesn't have a tile set, and will ask you to create one, either by pressing the plus button on the bottom-left or dragging in a tile set from your documents into the little box on the left.


Our tile set image has appeared inside the tile set menu, and has been converted into a grid. All the parts of it that have been highlighted can be used as tiles. If there are any spaces that shouldn't be highlighted, you can use the eraser tool in the top-left to un-highlight them.


However, we do want the top of the palm tree to be one big tile. To turn multiple tiles into one big tile, go out of eraser mode, then shift-click and drag out the tiles that you want to all be put together.


Painting tiles onto your stage is a simple matter of clicking the tile you want to add in the TileMap menu, then clicking where you want to add it in the viewport.

Hold down the mouse button to draw out multiple of the same tile at once.

If you don't like where you've put a tile, you can right-click to remove it.

Using what we've learned above, I've drawn out the very rough beginnings of a first level.

Tile Collision

...and the knight just falls through the level. The problem is these tiles don't automatically have physics to them - they're just images. To add physics to them, we must give them a physics layer. We can do this by going into the inspector and, with the TileSet selected, going down to "Physics Layers", opening it up and clicking "Add Element".
A "physics layer" is what you use to determine which objects collide with which other objects. Only objects that are on the same physics layer will bump into each other.

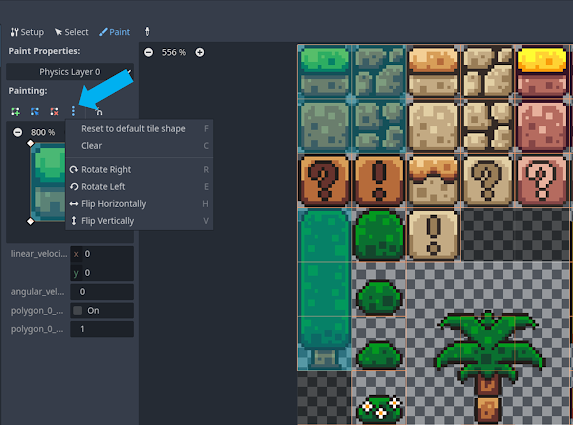
Go back into the tile set editor by clicking where it says "TileSet" at the bottom of the screen. In order to decide which of our tiles will go in this physics layer, we must go into paint mode - click the "Paint" button at the top of the menu.


A blue box will appear in the painting box. This box is the size of one tile. Click on any tile in the tile set, and that box will fill it up with blue. All the pieces that are blue, the player will collide with when they walk into them.


...this time, the knight stands comfortably on top of the tiles without falling through.

...we can also move them around with the left and right arrow keys. However, the camera doesn't follow them off-screen.

While I'm here, I'm also going to go into the camera's inspector, go down to "Position Smoothing", and turn it on so the camera moves around a little smoother.

Now if we try it in play mode...

...now the camera smoothly follows around the player wherever they go.
Having pressed C for clear, I can click on all the tiles that make up the tree in my tile set to remove the blue from them, rendering them immune to player collision. If I want to go back and make them blue/collide-able again, I can press F for fill on my keyboard and select them again.

And if we try it out in play mode, we can see the knight passes behind the tree instead of bumping into it.

One more thing about collision - I mentioned how the blue box, that determines how much of the tile you can collide with, is the size of one tile by default. But what if you have a sprite that's smaller than one tile, such as our bridge pieces? There's a lot of empty space in those tiles, and if we fill the whole thing in with blue, then it means our character will start colliding with empty space.
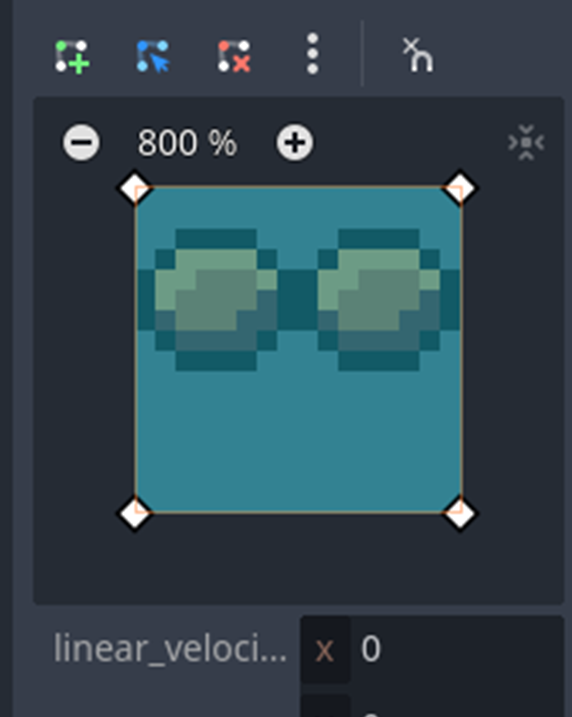


Once you're happy with the shape, click on the tile in question in the tile set to fill it in with this new shape.

You can click anywhere on the side of the blue box to add a new point to move the shape around by. Right-click this new point if you want to remove it again.

Using what we've learned so far, I've made it so the bridge tiles are all more accurately outlined.

The results of this can be seen in play mode, as the character follows the bridge's curve down and up.

Moving Platforms

Moving platforms in Godot are made from an AnimatableBody2D node. Create a new scene, and for the root node, click "Other Node" and search up "AnimatableBody2D".


In the inspector, click on Region, tick the box by "Enabled", then press "Edit Region".

In the window that pops up, click-and-drag around the part of the picture you want to show up in-game. If you want to be more precise, change the snap mode in the top-left to "Pixel Snap".
In the corner, we can see that the AnimatableBody2D node is complaining about something. It wants a CollisionShape2D node attached to it.

I'll create a new CollisionShape2D node as a child of it, and in the inspector I'll make it's shape a New RectangleShape2D.

Drag around the edges of the blue box that appears in the viewport so it covers most of the platform.

Now all that's done with, I'll rename the AnimatableBody2D node to "platform", save the scene, then go back to the game scene.

Indeed, if we try it in play mode, we'll have a floating platform in mid-air that our character can jump on.

Notice how if the knight jumps while underneath the platform, they'll bonk their head on it. This may be what you want, but in most 2D games, characters can jump up to a platform while standing underneath it.

Back in the platform scene, we can go into the CollisionShape2D's inspector and turn on "One Way Collision".

The red arrow that appears indicates the direction that will be blocked by the platform. This means people can come up onto it, but they can't go down off it.

If we save the platform scene again and go back into play mode, we can see the character can jump up onto the platform from underneath it.

Notice how the player character passes behind the platform when they jump up on it. If we want to make it so the player appears in front, we could just move the player node so they come before the platform node in the scene menu... but now's a good time to learn about the z index.


Save it and run it in play mode, and you'll see the object in question show up in front of everything it passes by.


At the bottom, the animation menu will appear. It'll be empty, because we need to add a new animation to it. We can do so by pressing the "Animation" button in the top-left of the menu.

In-game animation in Godot works by creating "keyframes" - basically, we save the platform's location at a certain point, move it somewhere else, then save its new location and so on. The overall animation will be all these saved locations put together and played in order. It works a lot like it does in Blender, which we've covered in an earlier blog post.

The new keyframe will appear in a timeline shows up in the animation menu. It's right at the start, so it will be the first position the platform will be in.

To create a new keyframe, first we move the blue animation playhead a little further ahead in time - like one second, for example.

Then we move the platform itself in the viewport to the new position we want it to be in at this time. Press and hold Shift if you want to keep the platform straight as you move it.


This new keyframe will appear underneath where the playhead is in the timeline.


Press the button at the right side of the animation menu that looks like two arrows circling each other to make the animation loop (play over and over again). Press this button again to make it ping-pong - reverse itself so it goes back and forth from its start to end point.

You can make an animation play slower by increasing its length - type in the length you want in seconds in the box next to the clock symbol at the right of the animation window. You'll also need to drag the second keyframe over so it fills up the rest of this new time (you'll see what I mean when you try it for yourself).


Lastly, click the autoplay on load button at the right-hand side of the animation menu (the one that looks like an A inside of an arrow) to make sure the animation starts playing from when you start the game.


Detection Areas

The assets pack we've downloaded comes with some sprite frames for a floating collectable coin. Using what we've learned so far, we can add an AnimatedSprite2D to our new scene and give it its animation sprite sheet (you know, add new SpriteFrames in the inspector, then click the waffle button in the animation menu below).

If you try out the animation in the animation menu, the coin will spin a little slowly. Try changing the FPS number to 10 to speed it up. Also, remember to hit the auto-play button (the arrow with the A in it).


Now, back in the scene menu, we can see Godot is complaining about the Area2D node - just like with a physics body, it wants a CollisionShape2D attached to it.


Decrease the size of the blue collision radius by dragging the red dot on the edge of the circle.

Now we can just save this scene as "coin" and drag-and-drop it from the file system menu into our main level scene.

Pickup Code

A new code window will appear. I've explained this one several times before, but just to recap: the "ready" function is where we put all the code we want to happen when the game starts up, and "process" is where we put the code we want to have happen constantly throughout the game.

Truth is, we don't actually need these two functions in our script, so we can delete them. Instead, we can use the "_on_body_entered" function - this detects whether a collision body is touching the node this code is attached to. It's written out like this:
func _on_body_entered(body):

Anything written under this _on_body_entered function will be activated only when some kind of physics body is touching the Area2D node.
What we want to have happen in this event is for the coin to disappear. To do this, we need only type "queue_free()" underneath the function. This removes the node from the game once it's activated. If you want to see what it is a certain command does in the script, hold down Ctrl and click on it to be given a description of what it does.

Layers and Masks
However, the way things are, the coin will disappear whenever anything bumps into it, not just the player. We want to make it so only the player can make it vanish. We could add some code that checks what kind of object enters the Area2D, but a quicker way of doing it is by putting the player on their own physics layer.If you go into the player scene and into the player node's inspector, under "Collision" you'll see two sets of numbers - "Layer" and "Mask". "Layer" determines what layer the object is on, and "mask" determines what layers that object can interact with.

So, let's say we change our player's layer to 2. If we go into our coin scene and change its Mask number to 2, that means the coin will only react to objects that are on layer 2 - in this case, our player.

If we go into play mode, our character will be the only one able to pick up the coin. They can still walk around the level and stand on the floating platform, because the player's own layer Mask is still 1 - the player detects all the Layer 1 objects like platforms, while the coin detects the player on layer 2.

It's a little complicated, but try thinking about it like this - "Layer" determines which "Masks" can detect you, while "Mask" determines which "Layers" you can detect.
Bottomless Pits

We want it to stop following the player once the player crosses the bottom of our built stage (the part where our tiles end). We need to determine where that is first - in the top toolbar above the viewport, there's an icon that looks like a right-angle triangle. Click on it to enter ruler mode. You can click-and-drag in ruler mode to measure the length of something in pixels.


Now we need to make it so when the player falls off the screen, the game puts them back at the start of the level rather than letting them just keep falling. We need to create a new object that detects when the player is in an area they shouldn't be, and that means making a new scene.

Since we've put the player on physics layer 2, we want to change the Collision Mask of this new node to 2, so it only detects the player.

Rename the Area2D node to something like "kill zone". Notice how it's complaining about not having a CollisionShape2D? Well, this time, ignore it. I want to be able to use this item for all kinds of different elements in-game, and those elements all might have their own collision shapes. Instead, just save the scene, then go to the main game scene and click-and-drag the killzone.tscn file from the file system menu into either the viewport or under the first node in the scene menu.

Now we'll give it the collision shape it wants. Add a CollisionShape2D as a child of the killzone node, and this time, we'll give it a New WorldBoundaryShape2D.

The world boundary looks on-screen like a blue line stretching from one side to the other. This line actually goes infinitely across from left to right, so it will always detect the player if they cross that point wherever they fall. With the killzone (not the CollisionShape2D itself) selected in the scene menu, use the move tool in the top-left of the viewport (the one with four arrows) to move the node down so it's just a little underneath the bottom of the stage we've built.


When the player is in the kill zone, we want the level to restart. The command that does this is written underneath like this:
get_tree().reload_current_scene()

Now, if you try it in play mode, the level is completely restored to its original state when the player falls off the side and into the kill zone.

...you know, it's kind of jarring while I'm playing it for the screen to just immediately reset when I fall. Maybe I want to delay it for a brief moment - give the player some time to realize they've just fallen off the screen - before resetting the level.


Now, we want to use the code to activate this timer, then decide what will happen once it runs out. Of course, the first thing we need to do is add a variable for the timer into our killzone code. However, instead of just typing it down, I'm going to click-and-drag the timer node in the scene menu, hold CTRL, then click on a space above the first "func".

This will automatically add the timer in as a variable. It's already given itself the name "timer" (in white). The orange @onready means this variable will be added to the object the moment the object is "ready" (i.e. appears in the game). As to the green dollar sign, this denotes a "path" - it tells us which of our nodes the variable is fiddling with. If the timer were a child of any other nodes beside the root node, these parent nodes would appear in this green text to show us the "node path" leading to the node in question (so it'd be like $Node/AnotherNode/AThirdNode/Timer).

I'm going to start the timer in the "_on_body_entered" function. Right at the start of it, I'll make a new line and type in:
timer.start()

Of course, this means we're going to have to move our "reload_current_scene" command out of this function, and into a function that carries out when the timer runs out.
Now, if I click on the timer node in the scene menu, then go into the inspector and click on the "Node" tab at the top, I can see a list of "signals" this node gives off. Some nodes give off "signals" when something specific happens to them, and here's where we can see a list of those signals.

As a timer node, our node gives off a signal called "timeout", which activates when the timer runs out. If I double-click this signal, a screen comes up telling me I can connect this signal to the killzone code script itself.

If I click "connect", a new function will automatically appear in the code script: "_on_timer_timeout". Connecting the signal to the script has automatically added in this function, which will activate whatever code is written underneath it whenever the timer runs out of time.

With this in mind, I can cut the "reload_current_scene" command and paste it into the "_on_timer_timeout" function. Now, rather that restarting the level the moment we hit the killzone, it will wait until the timer runs out (so 0.5 seconds go by) before restarting the level.

This just makes things feel a bit more natural when the level restarts. It's easier now to tell when you've ran off the screen or made a mistake.

Adding a Background


In the tilemap-drawing menu at the bottom, you'll need to switch the layer you're drawing on from Main Stage to Background. To do this, click the drop-down button that has the current layer's name on it, and change it to the other layer.

You'll find the layer you're not drawing on will turn dark. Now, just as before, we can click on the tile we want to add in, then draw it onto the stage to create a background...

...wait a minute. Why's the sky in front? Go back to the "layers" area in the inspector. The order that the layers are in determines which is "drawn" first - so the Main Stage is drawn first, then the Background is put on top of it. To swap this around, click on the three lines by the Background segment and drag it so it's on top of the Main Stage segment.

Now the Background is drawn before the Main Stage, it will now appear behind the Main Stage layer.


Now there's a nice blue sky texture in the background of our level.

Adding Enemies

The yellow triangle will tell us that it wants some sprite frames. Over in the inspector, click where it says "Animation", then click next to "Sprite Frames" and select "New SpriteFrames" to add them in.

Click on these new SpriteFrames in the inspector (so it's highlighted in blue) to open up the bottom menu, where we'll actually choose what these sprite frames will be.

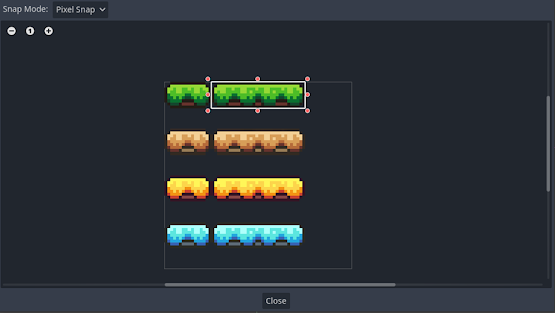
In the window that pops up, navigate to Assets, then "sprites", then select either the green or purple slime png.

This sprite sheet has four slimes in three rows, so make sure the "horizontal" value on the right-hand menu is 4 and the "vertical" value is 3.

There's three animations here - one for the slime appearing, one for it idling, and one for it taking damage. We only need the idling frames for now, so click on those frames - the four frames in the middle - and then click "Add 4 Frame(s)".

Our slime character will appear on the screen. Try moving it up so it sits on top of the horizontal X axis line.

Click this button that says "autoplay on load" so the animation will play the moment the slime appears in-game. You can also increase the FPS number to make the animation play faster.

Now, we want this slime to be dangerous - we want the player to be killed if they touch it. Fortunately, we already have a scene for something that kills the player if they touch it - the kill zone.

The yellow triangle will want us to add a collision shape to our killzone (we didn't give it one in the original scene so we could use it again and again for different objects). Add in a CollisionShape2D node as a child of the killzone, then, when another yellow triangle appears demanding a shape, go into the inspector and give it a Rectangle shape.


Now if we add our slime scene into the game scene, it will stand there playing its animation, and if we touch it, the killzone code will activate and our character will be teleported back to the start after 0.5 seconds.

Enemy Movement

position.x += 1
"Position.x" means the current position of the node (i.e. the slime) on the X axis, "+=" means "add" in Godot, and "1" means 1 pixel.
Since this is in the frame-by-frame "process" function, this line of code means "every frame, take wherever the slime currently is on the X axis and add 1 pixel to it".

Now if we save this and try it out in play mode, we find...

...the slime has just completely disappeared. It's actually gone shooting off along the X axis faster than we can see it. It's simply going too fast.
But maybe that's because our framerate is going too fast? If you've got a really good computer, it'll have a really high framerate - more frames, more times the slime will move one pixel per frame. If the computer's too fast, the slime will be too fast as well like we've seen here. But if the computer's too slow, the slime will be too slow as well, slogging along at a glacial pace.
To fix this, we need to multiply our speed value by "delta". You can see there's a "delta" right next to our "process" function - "delta" is basically how much time it's been since the last frame. If there's a lot of frames going by and not much time between them, delta will be smaller. If there aren't many frames and they're going slowly by, delta becomes bigger. If we times our speed by this delta, our slime won't move as much between frames if the framerate's high, but will move further between them if the framerate's low. This makes sure our slime moves at roughly the same speed on all computers.
So, instead of just increasing the position by 1, I'll change it to:
position.x += 1 * delta
"*" is what Godot uses for multiplication, so we're multiplying the 1 by the delta.

And, if we try it out in play mode:

...the slime is moving, but very, very slowly. "1 * delta" basically means one pixel a second, which is extremely slow. Maybe we can increase it up to something like 60.

Or, better yet, we can just make a speed variable. If we write the speed variable out at the top of the code, we only need to change the number in that line rather than changing it everywhere in the code.
So, at the top, I'm going to write a new variable called:
const SPEED = 60
"Const" is short for "constant", meaning this is a variable that doesn't change (we're not going to make it so the slime will randomly start going faster or slower). "SPEED = 60" means that whenever I write down "SPEED" in the code, it will know what I really mean is 60.
So, in the process function, I'll replace the "60" with "SPEED".

Now, if we hit play, we can see our slime is going at a much more sensible speed...

...but it's also going straight through the wall. Like I said, I want to make it so the slime changes its direction whenever it hits a wall.
So, I want this slime to know the direction it's going in, and I want it to change. That sounds like a variable to me. At the top of the code, underneath the SPEED value, I'll type in:
var direction = 1
"var" means "variable", direction is the name we're giving it, and "1" is... well, right now, 1 can be anything.

The idea is that 1 is meant to represent the direction the slime is currently going. If I want it to flip its direction, I'd turn it into -1 (if it was just 0, it'd just stop).
So, when do we turn 1 into -1? When the slime bumps into a wall. How can the slime check whether it's bumping into a wall? Well, it needs to use a raycast node.
A raycast node shoots out an invisible laser that lets the slime know what it's hitting and when it's hitting it. We can use the code to determine what the ray is looking for and what happens when it finds it.
Go into the slime scene, then add in a RayCast2D node.

A blue arrow will appear underneath the slime. Move around its red points so the arrow's head is just poking out of the slime's center.

This will be the "right" laser - the one that will let the slime know whether it's hitting anything from the right. Rename the RayCast node "RayCastRight" to reflect this.

Hit Shift + D to duplicate this raycast, take the duplicate arrow and point it in the opposite direction of the original, then rename this new duplicate laser "RayCastLeft".

Now we have two raycasts we can use for our slime, it's time to put them into the code. To add them as variables, we can do the same as we did to add a timer node to the killzone code: select both raycasts, click-and-drag them over to the variables, hold CTRL and release-click to add them in as variables automatically. We can see the code has named our right raycast "ray_cast_right" and our left raycast "ray_cast_left".

We want it so that if the right arrow (raycast) hits an object, the slime will start going in the opposite direction (-1), while if the left arrow hits something, it will go back in its normal direction (1).
If the question is "if", then the answer is an if statement. In the process function, just above the position.x line, I'll write down these two if statements:
if ray_cast_right.is_colliding():
direction = -1
if ray_cast_left.is_colliding():
direction = 1
In English, this means "if the right ray cast is hitting anything, direction becomes -1, while if the left ray cast hits anything, the direction is set to 1 again."

Now all that remains is to put this direction into the position code. So now my position.x line becomes:
position.x += direction * SPEED * delta

Now in play mode, the slime will ping-pong itself between the walls. However, its sprite will still only face the one direction.

If you go into the AnimatedSprite2D's inspector, you'll find an area called "Offset". If you open it up, you'll see at the bottom two check boxes labelled "Flip H" and "Flip V". This is, of course, flip horizontal and vertical. If you check the Flip H box, the sprite will flip around and face the other direction. I want to make it so the code itself checks this box whenever the slime changes direction.

In the script, I'll once more use the click-drag-CTRL-and-release method to drag a reference to the AnimatedSprite2D node into the slime script, allowing us to edit the AnimatedSprite2D's properties using the script itself.
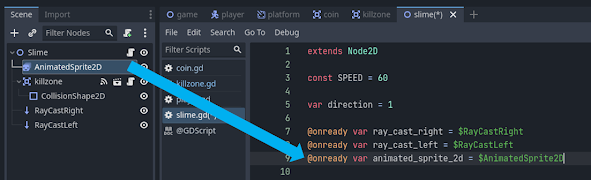
animated_sprite_2d.flip_h = true
animated_sprite_2d.flip_h = false

So, when you start off the game again...

The slime's sprite will change the direction its facing (it's Flip H) whenever it bumps into a wall and starts going the opposite direction.
Killing the Player

At the start of the _on_body_entered function, I'll type:
body.get_node("CollisionShape2D").queue_free()

Now when we play the game, when the slime brushes past us, the player loses their CollisionShape2D, and thus falls through the floor. When the level resets 0.5 seconds later, everything is restored to normal.

Engine.time_scale = 0.5

Engine.time_scale = 1.0
This makes it so when the killzone timer runs out, the engine goes back to its normal time scale of 1.0 before the scene reloads.

Try it in play mode and see for yourself how the game slows down and then restores when you touch the slime.

Input Actions

Here we can add "actions" - names for things for the player to do. These are kind of like variables - when we assign an action to a button here, whenever we type that action's name in the code, it will know we're referring to that button.

Next to where it says "jump", on the other end of the screen is a plus (+) icon. Click it an another menu will appear allowing you to select the button to be used for "jump". You can either find it manually by opening up the menus at the bottom, or, in the box that says "Listening for input...", you can press on your keyboard the button you want and it will automatically find it. Once you're done, hit OK.

Using the same method, I've added in a move_left button and assigned it to the left-arrow key. However, you can assign multiple buttons to the same action - press the plus button again to add a new button to the same action (in this case, I'll add the "a" key).

Now I'll use the same method to add a move_right command and assign its buttons as the right-arrow and "d".

Now I'm going to go back into the player's movement code. In the "physics_process" function, there's three bits of yellow writing - "ui_accept", "ui_left" and "ui_right". These are some input actions that Godot already has built in - basically the same as what we've done but with different names.

Coding Animations

Now, take a look a the line of code that starts with "var direction". What is this line doing? Well, it's creating a new variable ("var"), naming it "direction" and making its value be the result of the "get_axis" command. What is the "get_axis" command? What it does is it takes two buttons and assigns them two variables - the first button is -1, and the second button is 1. If neither button is pressed, the value is 0.

So, what I want is for the player sprite to face right if it's moving right, and left if it's moving left. Between the "var direction" line and the "if direction" life, I'll put another if statement:
if direction > 0:animated_sprite_2d.flip_h = falseelif direction < 0:animated_sprite_2d.flip_h = true
If you remember from math lessons, ">" means "greater than" and "<" means "less than". The first "if" states that if the value of "direction" is greater than 0 (i.e. it's 1, meaning we're pressing the move_right button), the flip_h box of the player sprite (remember that from the slime sprite?) remains unchecked.

Now if we try it in play mode, the character sprite will now face the direction it's going in.

Now I want to add a new animation to the character sprite, so it looks like it's running. In the player scene, with the AnimatedSprite2D node selected, click on the "Add Animation" button in the top-left of the bottom menu.

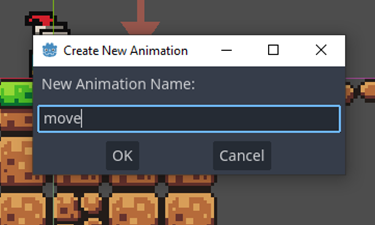
I'll do this twice to add two new animations here - one called "run" and one called "jump".

With the "run" animation selected, click on the icon for Add Sprite Frames (that looks like a grid), navigate to "assets" and click the player sprite asset.


If you press the play button at the top of the animation menu, you can preview the animation. It'll move a little slow, so increase the FPS to 10.

Now, with regard to the "jump" animation... we don't actually have a jump animation. We do have a single frame in the "roll" animation that looks a little like the character is falling, though. Using the same method as above, I'll give the jump animation this single frame to use.

Now it's time to make it so these animations are called up in the script. Go into the player script and, between the sprite-flipping if statement and the velocity if statement, type out:
if direction == 0:animated_sprite_2d.play("idle")else:animated_sprite_2d.play("run")

If we try it out in play mode, we can see the running animation play whenever the character is moving. Because our animation code comes after the flip_h code, Godot will flip the sprite first before playing the animation whenever we change direction.

However, say I want to add a jump animation as well. This means we have to do a few things to this animation code. First, we need to specify that this animation code only applies if our character is standing on the floor (i.e. not in the air). Godot has a built in character property called "is_on_floor". We can put our animation if statement into another if statement:
if is_on_floor():if direction == 0:animated_sprite_2d.play("idle")else:animated_sprite_2d.play("run")else:animated_sprite_2d.play("jump")
I've used the tab button to indent the idle-run animation if statement into this bigger if statement. If our character is on the floor, the game will pick between the idle and run animations. However, if it's anything else (and the only "else" to being on the floor is being in the air), the "jump" animation will play.

And, if we try it in play mode...

...our character's "jump" frame will appear whenever we're jumping on falling.
Scoring Points

In the scene menu, I'm going to rename this node "GameManager".

Why am I doing this? Because what we're talking about with scoring is a code that is always carried out in every level across the whole game. Not every level might have enemies or certain controls, but all of them are going to have scoring mechanics. To separate the per-level scripts from the whole-game scripts, game devs usually put their whole-game scripts under a separate node called a game manager (this is also often referred to as a "global script").

First things first - we want a score that goes up with each coin collected. That's a number that changes throughout the game, so that will be a variable. So I'll declare a new variable with "var", name it "score", and make it "= 0" by default.

Now I'm going to create a new function (as in a new set of code that does something specific). Underneath this variable, I'm going to write:
func add_point():
Now, this isn't like the other functions we've done, that are all based on Godot's own pre-built commands or signals - this is a function that we're making completely on our own. Godot doesn't have an in-built "add point" function, this is something that we've just come up with ourselves.

Now, in this function, I'm going to write:
score += 1
"+=" is Godot's way of saying "plus". So this is just saying "add 1 to the score whenever this function is carried out".

So... when is this function carried out? It's not in a ready or process function, so it doesn't happen at the start or throughout the game. It's not looking for any button presses, so it doesn't happen when we press a button. So when does it happen?
Well, it should happen whenever a coin is picked up. To do this, we need to "call" this function inside of the coin's own code. So we go into the coin script, and first of all we need a reference to the game manager as a variable. So, same method as before, I'll click-and-drag the GameManager node, hold CTRL and place it into the script...

...except, I don't like the look of those "..."s in front of the green path there. You see, the GameManager node is higher up in the node tree than the coin nodes, so this path is trying to double back around and access a node that's higher up than where it starts. The code will still work fine, it's just that this can get untidy and make it hard to find which node connects to which other node in a given script.
Fortunately, since a game manager is something that we only need one of, we can mark it as unique. We can do this by right-clicking the GameManager node in the scene menu, then going down to "Access as Unique Name".

Now let's backspace the variable in the code and try the same again. Click-and-drag the GameManager node into the code, then hold CTRL and release it into the script.

game_manager.add_point()

Now - I'm gonna go a little off-script here. The Brackeys tutorial has labels that tell you how many coins you've grabbed, and updates the number whenever you grab a new coin. However, this label only appears at the end of the level. I want to make is so this label is constantly on the screen, somewhere in the corner, so the player constantly knows how many coins they've got.
What we need to do that is a CanvasLayer node. The Canvas Layer is like another 2D layer that's separate from the 2D of the game itself. Whatever's drawn or stamped on here will follow the camera around. It's where you put things like health bars or scores.
Add a new node and search for "CanvasLayer". It won't be the first one that comes up, so you'll need to pick the one just called "CanvasLayer".

The CanvasLayer appears as a faint blue box outline in the viewport. So, on our screen...

...uhh... where is it? It's not the purple box - that's the camera. So where's the actually canvas layer?

There it is. A faint blue box much bigger than the level itself. This blue box is meant to represent the screen - wherever anything goes inside this box, that's where it'll be on the screen. This is how you make your GUI/HUD stuff like scores or health bars - you arrange them in this box, and they'll stick there on the screen independent of where the camera's pointing.
Now, as a child of the CanvasLayer node, I'm going to add a label node. A label is what you use when you want to add text to the game.

To write out what the label says, go into the inspector and type in the box at the top, under where it says "text". In my case, I've just written "Score".

Right now, this text looks a little small. In the inspector, go down to where it says "Theme Overrides", then go down to "Font Sizes". There's a box where you can type in a new font size, but if you click-and-drag over the box, you can scroll along font sizes that way.

Remember, the canvas layer box is a separate thing to the camera box. Right now, it looks pretty weird - like there's a giant "Score" right in the middle of the level. But resist the temptation to move the label for now - I kept making that mistake and ended up pulling the label out of the canvas box, meaning as its child node it wouldn't show up in the game at all. Just hit the play button and you'll see...

...that right there in the top-left is the label, and it will follow the camera around no matter where it goes.

If you want to move the label around, you can click-and-drag on it to do so, but make sure it stays within the blue box or it won't show up on the screen.

And if you go back to play mode...

...uh, well, remember to unhide the tilemap and camera nodes first. But either way you'll see the label has moved over the screen relative to where you put it in the blue box.

If you've got a pixelly-looking font, you may want to make sure its font size is a multiple of 8 (8, 16, 24, 32, etc.). Pixel art in general is 8-bit, meaning its size tends to fit into multiples of 8.


Of course, having a sign that just says "Score" following us around isn't all that helpful - we need it to display how many coins we've picked up.

...gah, I don't like that long path. Let me undo that with CTRL+Z.

Now, when we do the same drag-CTRL-and-drop method...

Much better. Now the code knows when we type "score_label", we're referring to the only score label it can be.
score_label.text = "Score: " + str(score)

...the score value in the bottom-left goes up by 1 for every coin we collect.
Audio

I'll rename this node "music", because this is where we'll put the music for our game. Over in the inspector, there's a box at the top that says "Stream". If I take a piece of music from my assets folder and drag it into this box, it will give that sound to the AudioStreamPlayer.

I'm going to check the box labelled "Autoplay" so the music starts playing the moment the game starts up.

By default, this music isn't going to loop. To make it loop, double-click the asset in the asset folder and check the box beneath "Loop" that says "Enable", then hit "Reimport".

Now this music should play (and repeat) over the level as you're playing it. Except, maybe the song repeats itself too much - every time you die and the level resets, it cuts back to the beginning. This is because the music is a node in the scene itself, and all the nodes are re-set when the scene restarts.

Staying in the game scene, if you go up to Project then into Project Settings, there'll be a tab at the top that says "Autoload". This is where we put all our autoload scripts and scenes. To pick a scene to autoload, click on the folder button at the top-middle and navigate to the music scene. Then, once the scene appears in the "Node Name" box next to it, click "Add".

Now if you play the game, you'll hear the music even though there isn't a music node in the scene itself. This is because the music scene is "autoloaded" - it automatically loads and activates before we start every scene. Not only that, but it doesn't reset whenever your character dies and respawns.

Just like before, we can drag in our coin pickup sound from the assets menu into the "Stream" box in the node's inspector.


Now, go back to the coin's AnimatedSprite2D node. This will change the bottom menu to Animation Sprites, but we want to change it to an animation timeline by going over the the Animation tab along the bottom.

Now go into the inspector and open up "Visibility". Take a look at what's changed - next to every option, there's a little key icon. Pressing this icon creates a "keyframe". I've talked about what keyframes are in my Blender walk cycle animation tutorial - they're "poses" (or frames in 2D animation) you can save and move around an animation timeline.

The first time you do so, a little box will appear asking you if you want to make a "RESET" track. Leave this box ticked for now - it means Godot will also automatically make an animation timeline based on the node's default state, which can be very helpful to go back to if you get anything wrong.


I'm also going to add a keyframe for turning off the coin's collision shape, so we don't collide with it while it's playing the sound (otherwise we could collect the same coin multiple times). So, same as before - go into the CollisionShape2D inspector and click the keyframe next to the "Disabled" option to add it into the timeline.


Now we're going into the PickupSound node itself to add a keyframe that makes it play. Go into the PickupSound's inspector and click the key by where it says "playing" to add the option to the timeline.

Now - instead of just clicking "On" (the sound will play then click off again, way too fast for you to add it as a keyframe), let's go down into the timeline and click on the PickupSound's keyframe itself.

Then just go up into the inspector and just change the "Value" to "On".

Now, all of these keyframes are on second 1 in the timeline. I want them to immediately play the moment the animation starts, so I'll select all the keyframes by CTRL-clicking them, then move them all over to the start of the timeline at 0.

This is because in second 1, I actually want the coin node to properly disappear. Did you know you can activate pieces of code inside the animation timeline itself? Drag the playhead to the 1-second mark, then click the "Add Track" button. From this we can pick the green "Call Method" track, which activates a script method (or function) when the animation reaches this stage.

All of our code is right on the "Coin" node itself, so just select "Coin" here.

Now the node will appear in the animation timeline at the bottom (you might have to scroll down to see it). Right-click the playhead right when it's over the 1-second point and select "Insert Key".

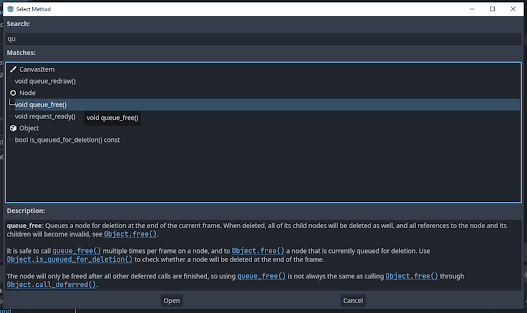
The function we want to call is the "queue_free" function, so type that into the search bar and click the option that says "void queue_free" ("void" is just another way of saying function).
Now the "queue_free" function - the one that makes the coin node actually disappear - will carry out one second after the coin plays all the other animations (that make it seem like it's disappearing).

animation_player.play("pickup")

Now if you try it in play mode, the sound effect will play when the coin "disappears". Except, of course, it hasn't disappeared - it just looks like it has thanks to our animation keyframes. It disappears for real a second later, also because of how we put the "queue_free" command inside the animation rather than the code itself.


Here, you can put all your audio nodes into "buses" (volume-control panels). Hit the Add Bus button to add another bus. I've added two buses - one for the music and one for the pickup sound effect (the bus that's already there is the "master" bus that controls the volume of the whole game).

Back in the sound's inspector menu, there's an area called "Bus". Right now, the sound is going into the Master bus. Click on it to change it to whichever other bus you think it needs to be.

Now when you drag around the slider on the bus, you can raise or lower the volume of the sound in-game.


Comments
Post a Comment