Beginning with Blender
Blender is a free tool you can download that lets you make 3D models. It also lets you animate them and work in 2D. With Blender, we can take the character model we've drawn and create a 3D object out of it, then create animations for it to use in any video game project we might be making. Blender is often the place game devs make the models they're going to use in their games.
Seeing how I'm a complete novice with this kind of thing, I've started off by just learning to navigate around the scene and using some basic modelling tools.

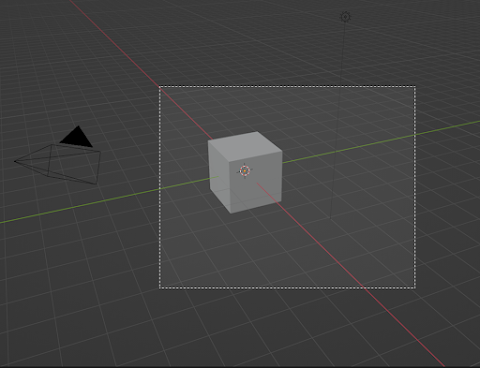
Open Blender and this is the first thing that will show up. "General" is highlighted, which is just the basic default template for making 3D models, so we'll just select that mode for now.

- The viewport is the big screen in the middle with the cube in, and is where you'll do most of your modelling.
- The "Outliner" is in the top-right, and lists all the objects currently in your Blender scene (just like the Unity hierarchy and the Godot Scene Menu).
- The properties menu is in the bottom-right underneath the outliner, and lets you edit the properties of the currently-selected object (like the inspector in Unity and Godot).
- The animation timeline is at the bottom, and is used for creating animations - animation in Blender works by putting your object in a certain pose, saving that pose at a point on the timeline, then going up to another point on the timeline, changing the pose and then saving it again.

Moving Objects

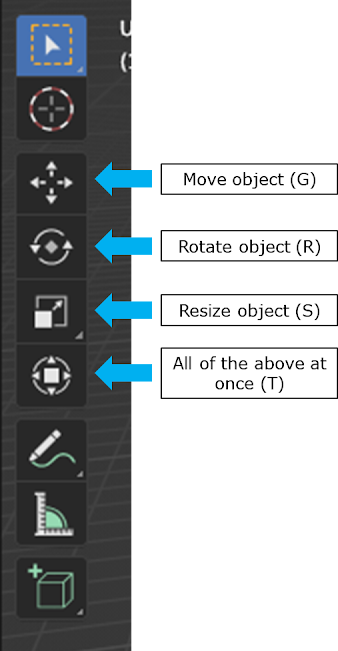
If you want to move it by clicking and dragging, we can either go to the viewport's side menu and press the Move button (the one with the four arrows), or we can press "G" for grab, and the object will just follow where our mouse is.
What if you only want to move the object along a certain axis? While you're moving the object around with the G key, press the X key, the Y key or the Z key to lock the object to the X, Y or Z axis respectively.

You can also rotate and resize your object using the same principle. To rotate an object, select it and press "R" for rotate, and to resize an object, press "S" for scale. You can also select these options from the viewport's side menu.


If, while you're moving, rotating or scaling an object, you change your mind and don't want to move/rotate/scale it after all, press the right-mouse button to send it back to where it was before you moved it.
Adding New Objects


There's a lot of things you can add here, but for now we'll just add another cube. Like in Unity and Godot, 3D shapes are called "meshes" here. Go down to "Mesh" then click on "Cube" to spawn in a cube mesh.

The 3D Cursor

While in cursor mode, click and drag around the scene to move the 3D cursor into that location. Now whenever you create new objects, this is where they'll spawn.


Edit Mode

In Edit Mode, the shape that we're editing will be highlighted in orange. When we edit a shape, we can move around its faces, its edges and its vertices to turn it into a new custom shape.
- Faces are the flat sides of the object
- Edges are the lines that separate the faces from each other
- Vertices are what Blender calls the corners of the shape

In the top-left, right beside the Mode Select tab we just used, there will be three icons. You can use these to switch between editing vertices, edges and faces. Right now, vertices is the selected mode, which is why the corners of the shape all have dots on them.

If you click on one of these dots, you can move that part of the shape around in the same way we moved things around in Object Mode - by pressing G for grab, that part of the shape will follow around our mouse.

Again, if we press the X, Y and Z keys while moving a part of the shape, we can lock it to the X, Y or Z axis.

By changing between face, edge and vertices mode in the top-left, we can move, scale and rotate the individual pieces of the shape just like we did with the whole shape in Object Mode.

Extruding, Indenting and Bevelling

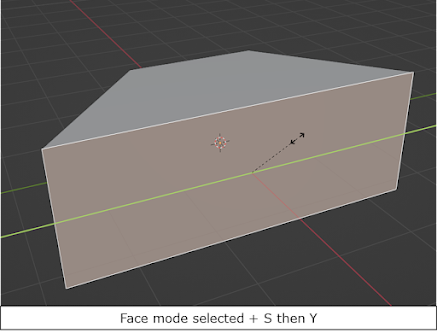
Still in face mode, press "I" for inset, and a new face will be created for the shape right on top of the old face.

Now in edge mode, press Ctrl+B for bevel, to make a new face out of that edge.

While bevelling, scroll the mousewheel to add more segments to the bevelled area, which will smooth out the area and turn it into a curve.

Loop Cuts

If you scroll your mousewheel while making the cut, you can increase the amount of cuts you'll make.

Once you're happy with the amount of cuts you're making, click to make the cut. Your mouse cursor will now turn into two arrows - this means you can move the cut along the shape to decide where it will go. Click again to put the cut down where you want it. If you right-click, the cut will go right back to the center of the shape.

Press K for knife to bring up the knife tool. This will let you cut edges into your shape manually. Click on the points you want to cut and press enter to make it.

Seeing Through the Model

Wireframe mode will make the shape completely see-through, so that only the outsides can be seen.

Another method is to turn on X-ray mode by pressing Alt+Z. This will have a similar effect, allowing you to see and select parts of the shape on the side you're not facing.

Modifiers

There are lots of modifiers you can use, but one I find myself using a lot is the Mirror modifier. This reflects one side of the model to the other side, and is invaluable in creating symmetrical models.

For example, here I've added a vertical loop cut going straight down the middle of the cube. Then, I selected all the vertices on one side of the cube and deleted them, leaving only half of the cube behind.

If I go into the modifiers menu and create a new mirror modifier, then change its Axis setting from X to Y, the one half of the cube will be reflected over to the other side of that axis.

That means not only will the cube be whole again, but if I move around one side of it, it will move around the other side as well.

Smoothing out the Mesh
Using just what we've learned above, I've made a kind-of-sort-of person shape.

The result might look... still kind of weird and jagged. This is because Shade Smooth is actually a trick of the light, making it so the light shines on every adjacent face on the model as is it were one big face. Shade Flat, where the light highlights every individual face, is the option we just switched from, and we can switch between the two by right-clicking in Object Mode.

To smooth it out more, we can use another modifier, the Subdivision Surface modifier, to double the amount of vertices on the object.

Where it says "Levels Viewport", you can increase the amount of doubled vertices the modifier will produce... though in our case I think just the two is plenty. Ideally you don't want to add too many of these levels to your mesh to avoid clogging it up with unnecessary geometry. From what I've seen, it rarely goes above 2 levels.

You'll often have to "apply" modifiers in order for them to show up in the final project. To do this, click on the little drop-down arrow at the top-right of the modifier and select "Apply". You can't do this in edit mode - you have to go into object mode to apply them. Make sure you've absolutely happy with the changes the modifier is making before you press apply, because the modifier will disappear from the inspector once it's applied.


Proportional Editing

If you use G to grab one of the vertices in Edit Mode, you'll see a big circle around your cursor. When you drag around that vertex, not only will it move around, but all the other vertices in the circle will move around with it. This works the same when rotating with R and scaling with S.

You can scroll on the mousewheel to change the size of this circle. The bigger the circle, the more geometry will move with your selection.

And again, if you press the X, Y and Z keys, you can lock the movement to the X, Y and Z axes. Remember to turn proportional editing off with O again once you're done with it.

Shrinking and Fattening

Separating and Joining Parts of an Object

You'll have to go into Object Mode if you want to move around or edit that part of the object again.

If you select two separate objects by shift-clicking, then right-click, you can join the two of them together into a single object by selecting "Join" (or alternatively by hitting Ctrl+J).

You can even join together objects separated by space. Of course, you might want to go into Edit Mode to close all the gaps up.

We can connect individual vertices together using the merge tool. Either right-click and go down to Merge or press "M" for merge - a series of options will show up allowing you to fuse the selected vertices into one big vertex.

Of course, it won't actually bring parts of the mesh closer together...

If you've got a bunch of vertices around one edge and you want them to fuse with the vertices of another nearby edge, you might want to select Merge by Distance. A box will pop up in the bottom left that will let you change the merge distance. It should be small enough that one vertex merges only with the other it's closest to (so you should move the edges as close to each other as you can when doing this).

Materials


While Material Preview mode generally shows you what color the object is, Rendered mode takes into account where the lighting is in the scene for a more realistic effect.
Rendering

...uh, you might want to move around the camera object in your scene to get it pointing somewhere more cinematic. There's a little camera icon to the side of the viewport you can press to look through the eye of your camera, and if you press G while looking through it you can move the camera around while looking down it.


Comments
Post a Comment