Waiting for Godot (to Work)

If you haven't heard the big game-dev news, Unity, the long-time go-to game creation engine for people just starting out in games development, has recently lost its freaking mind. What made Unity the people's choice over the triple-A favoured Unreal Engine was that while both were free to use, Unreal creams 5% of the profits you make from a game made on its engine, while Unity just let you have it for free.
Now, clearly in dire financial straits, Unity has changed that model - now they've implemented a monthly "installation bill", meaning you have to pay five cents for every time someone installs your game on their computer. This is way more complicated a process than just taking a cut of the overall profits, since not everybody who's installing a game has paid for it - they might be installing a game they already own on a new system, or re-installing the game to fix a problem with it or something, or hell, they might've just even pirated the thing.
Since Unity is demanding devs pay the installation tax whether or not those installs were from new buyers, and since they're applying this policy retroactively, meaning every game already out there made on Unity is going to be charged for each install going forward, pretty much every developer who used Unity has, as one person, got up and walked out. Everybody's leaving Unity to go find a new engine to make games on that won't put them in debt. From what I've seen, the two biggest contenders for Unity's crown are the Unreal Engine, and a free open-source engine called Godot.
I mean to look at both of them down the line, but for now I'll try my hand at Godot. The only tutorial I've followed thus far is Mina Pêcheux's short beginner's guide to Godot (https://youtu.be/N3XaN_R38Jc), which shows you the basic ropes of how to create objects in Godot and assign them properties. I tried to replicate her method as best I could, and below is a step-by-step recount of how I went about it.
If you're a fellow refugee from Unity like me, then you'll need to be aware of the different terms Godot uses - it uses "scenes" instead of gameObjects, and "nodes" instead of components, and rather than putting down a gameObject and filling it with components, you create all the components (nodes) individually and then build them up into a functioning gameObject (scene).
Opening a Godot Project
Now, the way of creating a new Godot project is kind of arcane: it wants you to put your project into an empty folder in your documents. Go into your documents and create a new empty folder to hold the game, then where it says Project Path, click on Browse and then select that folder.


Adding Nodes


So, uh... what exactly are we moving and rotating? There doesn't look like there's anything there. The 3D node has only given us the 3D transform - it's given us the ability to move the object around in 3D space, but we haven't told it what that object is.
That object, if we're working in 3D, is a mesh - a shape, basically. In 2D it would be a sprite, which is basically a picture.
This mesh, like everything in Godot, is a type of node. So, let's right-click on Node3D in the scene menu and click on Add Child Node - this will attach a new node to the 3D node.

A window will come up allowing you to select which node to add. We're looking to add a mesh, so just type "mesh" in the search bar on top. A number of options will show up, but Godot will have conveniently highlighted the one we want: MeshInstance3D (an "instance" of a 3D mesh).

So we add in our 3D mesh and... still nothing shows up.

But look over on the right, in the inspector: there's a segment that now says "MeshInstance3D", and beneath it is a property called Mesh. And right next to it, we can see it says "<empty>". It is here that we need to pick what actual mesh we're going to use.
Click on where it says "<empty>" and select one of the meshes to show up - in this case I'll pick a simple cube by clicking New BoxMesh. If you want, you can click Load at the bottom to search your files for a mesh you've already created in a program like Blender, for instance.

Now a white box will show up in our scene.

Pull on the arrows or the rings and you'll see the box move around and rotate.

Adding Materials to Meshes
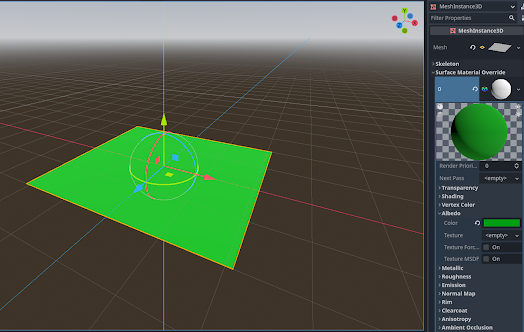
By default, every mesh is going to have the same white color, which is not that great if we want to tell all the objects apart. To change a mesh's color, we must give it a material.
However, if you try creating a new node and looking up "material" in the scene menu, you won't find anything. Instead, look in the cube's inspector and you'll see a part that says "Surface Material Override". Click on it, and you'll see a part labelled "<empty>", just like with when we were selecting a mesh. Click on the "<empty>" and select New StandardMaterial3D to create a new 3D material for the cube.

Now the "<empty>" will be replaced by a white circle. Click this white circle and you'll be given a load of options that change how the cube looks. Feel free to experiment with them, but right now we'll just go to Albedo, where we can change the object's color. Click on the white rectangle next to "color" to change the color of the cube.

Combining Scenes Together
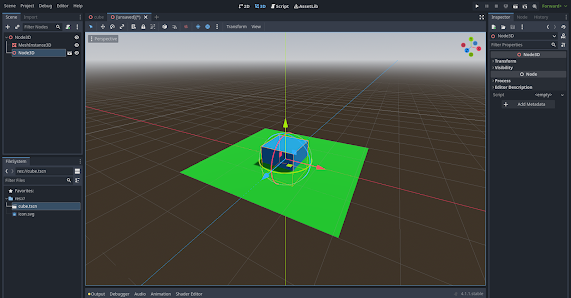
It's not much, but here we have our first unique Godot creation. Now we need a stage in which to put our cube in. We could just try building the level around the cube, but Godot works better when we just keep this whole scene as a cube, create a new scene to be the level, then add the cube scene to the level scene.
Go up to the top-left, where it says Scene, then click on it and go down to Save Scene (or just press Ctrl+S). Give your scene a name like "cube", and Godot will save this scene into your empty project folder. This folder will contain all the scenes you make for your game from here on in.

Now in the same top-left Scene drop-down, click on New Scene or hit Ctrl+N. Another empty Godot scene will open up. At the top of the viewport, you can switch between scenes you've created on the fly by pressing their tabs.

Now, using what we've learned already, we can make a floor upon which to put our cube. We start by selecting a 3D scene root node, then adding a MeshInstance3D child node to it like before. In the inspector, we click on <empty> and select a shape for our object. This time, I've picked a New PlaneMesh, since a flat plane would be more appropriate for a floor than a cube.


Now, let's add our old scene - the cube - into our new scene - the ground. In the bottom-left of the screen, you'll find the FileSystem menu, which contains all the files currently in our Godot folder. We can see that in there is our cube scene. Click-and-drag the cube scene from the FileSystem menu up to the Node3D in the Scene Menu.

Camera and Lights
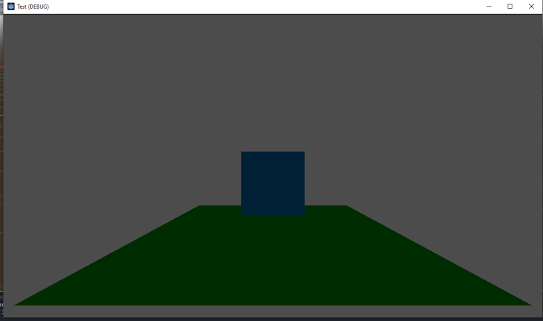
Now, let's run this scene and see how it looks. In the top-right, press the play arrow button to play the scene. It will ask you whether you want to make this scene the main scene to run whenever the play button is pressed, which we do, so just hit Select Current and save the scene as something like "ground".
Now the game will run in a new window, where it... uh... it's not showing up.

It turns out we need to have a camera in our scene so we can actually see it in play mode. Add a new child node to Node3D and type in "camera" - the first result you'll get will be Camera3D, which is the one we want.


If we want to brighten things up, we need to add a light node as well. Add a new child node to Node3D and type in "light". One of the options will be highlighted, but in this case we actually want to select DirectionalLight3D a little further up.

A shining light will spawn in the viewport. A big white arrow will point to where it is the light is shining - move it around until you feel like you have something adequate. This angle I've picked is not perfect, but it'll do.

Rigidbodies, Collision and Physics

Now our scene looks a little bit better... except for one thing. The blue cube is actually floating above the ground plane. It would look better if it dropped onto it when we pressed the play button. In other words, we should add some gravity to the cube to make it fall.
Go back to your cube scene and add a new child node to the Node3D root node. Look up "rigidbody" and you'll find the RigidBody3D node. A "rigidbody" is what most game engines use to make an object be affected by forces like gravity and friction.

Now the rigidbody appears in the Scene Menu... except look closely, and you'll see a yellow exclamation mark next to it. Move your mouse over it, and it will tell you that it wants a collider node attached to it. A collider is how a game engine tells when one object has bumped into another.


…and it's still not going to be happy. Another exclamation mark will pop up next to the collider. Hover your mouse over it and it will tell you that the collider, just like the mesh, will actually need a shape of its own selected for it.

Over in the inspector, you'll see yet another <empty> symbol underneath where it says "CollisionShape3D". Just like selecting the shape of the mesh, we must now select the shape of the collider. Click on <empty> and go down to a suitable shape for the collider - in this case, a New BoxShape3D.

A little outline will appear on the cube, showing where the collider has been added.

Now go back to the ground scene and we'll test this out. Press the play button, and...

…still nothing happens? What did we do wrong this time? Well, go back in the cube scene's Scene Menu. Doesn't look like there's anything wrong there. There's a mesh, there's a rigidbody connected to a collider...
…wait, hold on. The collider and the rigidbody are connected to each other, but not the mesh. So it turns out that the shape is technically falling - its rigidbody and its collider are going - but the mesh - the part of the object we can see - is staying right where it is, because we haven't connected it to the other falling nodes. Since the rigidbody isn't connected to the mesh, the mesh isn't going to be affected by gravity even though every other part of the shape is.
To rectify this, we attach the mesh to the rigidbody by clicking and dragging the mesh in the Scene Menu on top of the rigidbody. Now it's a child of the rigidbody, wherever the rigidbody goes, the mesh will follow.

Now we press the play button again and try it out. And indeed, the cube does fall...


…huh. Now they're both falling. It turns out we don't want to give the ground plane a rigidbody node - if it's not going to be moving, we want to give it a StaticBody3D node. This is a special node that makes it so objects can still bump into the staticbody, but it won't be moved around by forces.


What a cool, well-written tutorial!
ReplyDeleteOne small nitpick:
Scenes don't NEED of of the base nodes (Control, Node2D, Node3D) as the root, any type of node works.
In your case, it would make more sense for the rigidbody to be the root. Right now, your cube is moving away from the origin of the 'cube' scene (the node 3d) when it falls. If the rigidbody was the root of the scene, the whole scene would move when it moves, which is more logical imho.