Drawing a Stylized Character from the Side
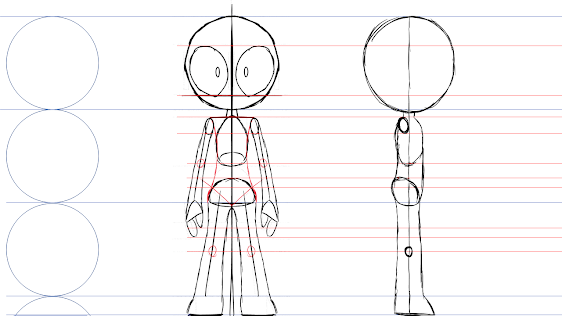
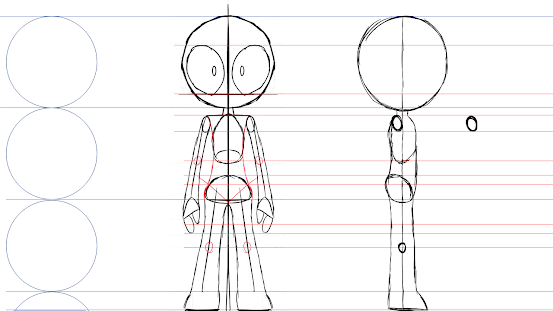
We've drawn what our character looks like from the front (https://corpsephageblog.blogspot.com/2023/06/revised-stylized-character-model.html), but in order to get a clear idea of what they look like from every angle, we must now draw them from the side. This can take a fair bit of guesswork, but it helps to draw your side character next to your front-facing character so you can compare where all the body parts are.
Again, if you're less than artistically inclined, you can make a sideways character profile just by using the shape tool in PowerPoint. The main idea is to use horizontal guidelines to keep all the body parts consistent.
1.
Draw straight lines going sideways from the position of all the main body parts. See here I've marked out where the top and bottom of the eyes are, so they'll be the same size on the side view.
2.
Draw these horizontal guidelines on as many body parts as you think you'll need.3.
4.
As before, we draw a straight line down from the top of the head to the bottom of the feet.
5.
Again, the neck is about the same thickness from the front as from the side.
6.
Since this is a side-view, we only need to draw one shoulder circle instead of two. It's about the same size as it is in front view, however, I actually put it just behind the center line, a little further back on the body.
7.
I use the guidelines to draw where the ribcage starts and ends. In terms of thickness, the ribcage is about just less than a quarter thinner than the front-facing ribcage. Also note how it curves just a little more on the side without the shoulder circle.
8.
We use the guidelines to figure out where the pelvis is. The pelvis is a slanted shape, but if you like you could just use an ordinary circle.
9.
Now we can connect the ribcage and the pelvis together to form the torso. Note how the line at the character's back curves inward a bit to follow the spine.
10.
We begin the legs with the knee circle, using the guidelines to judge where it is, keeping it level with the front-facing knee circles.
11.
While we're at it, we draw the bottom of the feet. It's roughly the same size as a foot in the front-facing view plus about a half stretching forward for the toes.
12.
Now we can draw the outline of the leg and foot, using the same methods we did for drawing them in a front-facing view.
13.
Now we can start drawing the arm. However, we don't want the arm to get in the way of the rest of the model. Instead, we take the shoulder circle and draw another one level with it floating in the air in front of the character.14.
15.
The elbow circle goes right where the bottom of the ribcage is.
The palm of the hand from the side view resembles a round-edged cone (think about the shapes as if they were 3D).
17.
A curve going down from the cone, bulging out slightly right, forms the mitten-like outline of the fingers. You can draw some lines to indicate where the fingers are, and you can draw the thumb as a curve just poking out from halfway down the palm to halfway down the fingers.
18.
One eye, roughly about the size of one front-facing eye (maybe a little thinner) can be found in front of the halfway line, the less curved edge just about touching the halfway line.
This is roughly how it is I draw a side-view of a character. After this you can erase all the unnecessary details and add in things like clothes, again using the guidelines to determine where things are.
Now we have a complete rough outline of a character model, we can import this into the free Blender program and use it to create a 3D model of our character, which we can then animate by giving it a skeleton. Using the same guideline method, you can also draw a 3/4 view of your character - what your character looks like when they're standing between the front and the side, as if they were standing on stage.


Comments
Post a Comment