Quick Look at Adding Clothes to a Character in Blender
Before we move on to rigging and animating the character, I'm going to take a very quick look at adding clothes to your character. The simplest way I know of doing it is to take some of the geometry from your character mesh, separate it into its own object, then use the solidify modifier to thicken it out.
I've taken the character mesh I created in my last Blender-themed blog post and I've changed it around just a little - nothing drastic, I've just moved the arms a little further back and made the heels shorter.

In edit mode, in wireframe view, I've used the B key to box-select all the parts of my character's mesh that I want to separate into a T-shirt.

I've hit Shift+D to duplicate these parts, then hit P to separate it into its own object (I just picked "Selection" from the menu that comes up).

Now, if you go back into object mode, you can see that this duplicate of the selected mesh parts has become its own object, and can be moved around freely without affecting the original mesh.

In the top-right of the screen, under where it says "Scene Collection" is a list of everything in your scene. The new shape we've made is called Cube.001 - I'll rename it to something easier to keep track of, like "shirt".

The Solidify Modifier
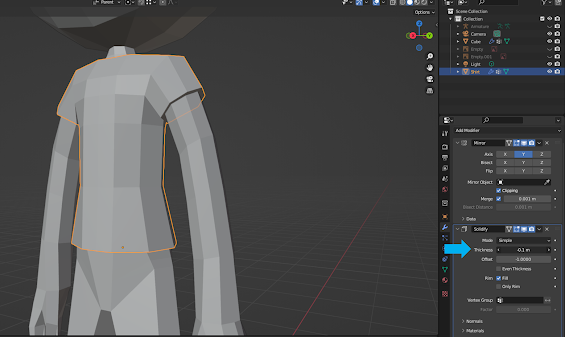
If we click on the blue wrench tab in the side menu with the shirt selected, we can see it already has a mirror modifier on it, just like the mesh we separated it from. I'm going to add another modifier to it, called the Solidify modifier. The Solidify modifier's job is basically to make objects thicker.
The Solidify modifier has a value in it called "thickness". If I decrease its value (or click-and-drag it to the left), the shirt mesh grows thicker on its outside.
If you were to go into edit mode now, it might be difficult to edit the shirt's mesh. But if you stay in object mode, click the drop-down arrow at the top-right of the Solidify modifier, then click "Apply", you can then edit the model in light of its new thickness.

The shirt will also be mirrored on either side - if you want to stop it from being mirrored, you can apply the mirror modifier from object mode as well.
Materials in Blender
It's hard to tell the shirt apart from the body here, since they're both the same color. But if you go down to its "materials" tab in the bottom-right menu, you can change things like its color or texture. It's the second tab from the bottom that kind of looks like a red beachball.

At the top of this menu, we can see we already have a material selected. This is the default material of the scene, that both the body and the mesh already has. If I were to change its color now, it would change the color of both these objects.
Instead, I want to create a new material for the shirt by pressing the "New Material" button just underneath the material selection box.

A new material will appear in the box that applies just to the shirt. Now, if you click on the colored bar next to where it says "Base Color", you can change the color of the shirt, while the body will keep its grey color. If the color isn't showing up for you, try pressing X and changing the view mode to Materials Preview or Rendered.

You can use the above method to create other pieces of clothing such as pants, shoes, gloves, and even hair.


Comments
Post a Comment