Stylized Low-Poly Character Model in Blender
Using what we've learned in our last Blender tutorial (https://corpsephageblog.blogspot.com/2023/09/beginning-with-blender.html) we can now try making our own character model. I've started off in a simple default Blender scene with a cube right in the middle. I'm looking right at it on the X axis, by clicking the red X on the compass in the top-right corner of the viewport.
Now, this isn't really going to be a tutorial, because there's no right or wrong way of making a character model - as long as you've got a shape that looks like a character by the end, you've got something you can add bones to and animate, and it doesn't matter too much about what you used to make it (mostly - if your shape's very complicated and got billions and billions of vertices on it, you might have to make another layer on top of it that's just simple low-poly geometry, so it's more manageable to animate).

Adding Reference Images
The first thing I want to do is add some reference images. In the past, I've made drawings of a simple character model - one facing the front, one facing the side. You can learn how I make a front-facing character drawing here and a side-facing character drawing here.
Go up into "Add" in the top-left toolbar (or hit Shift+A), and go down to Image, then select reference image to add an image from your files into the scene. You can also click-and-drag an image straight from your documents into the Blender window to add it.


I've moved the reference image a little upwards so it looks like the character is standing right on the Y axis (remember it's G for grab).

Now I'll add another reference image for my side character view. I'll start by focusing my camera down the side of the character by pressing one of the green circles of the axis compass on the top-right. I've picked -Y so it aligns with my image, which is looking down the right side of the character.

(By the way, if you want to know what the keyboard shortcut for something is, you can hover over it with your mouse and it will tell you if one is available).
Now, with the same method as before, I've added the side-view of the character and moved them so they're aligned with the character's front view.

I've had to tinker around with size and scale somewhat, but I've got it so both images are roughly aligned with each other.

Changing Image Opacity
Of course, it's hard to see anything with these images in the way. We can select an image and change it's opacity to make it see-through. With an image selected, go into the inspector and click on the side icon for "Data" (second from the bottom, it looks like a red picture frame with a mountain and a sun in it). Then, check the box where it says Opacity, and drag around the opacity meter next to it.
When you drag it to the left, the image should become more see-through.

I've decreased the opacity of both images so I can see through them better.

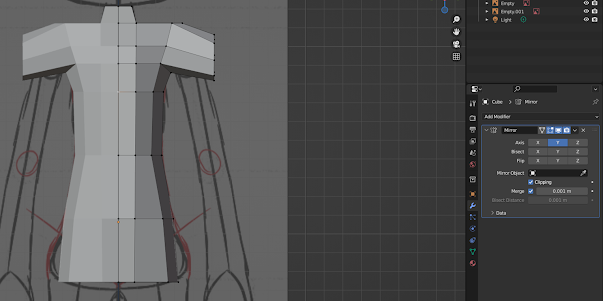
Modelling the Torso

(I've also just noticed that the image is very slightly off-center, so I've just moved it a tiny bit to the left so the character's middle line aligns with the blue Z axis line.)

Now I grab all the vertices on the left side of the box and delete them with X.

Now I click on the blue wrench in the inspector side menu to open the modifiers menu, and create a new mirror modifier for the object. I change the X axis to the Y axis, and I enable Clipping so both sides of the reflection always join in the middle. (We don't have to apply it yet, not until we start messing around with animating the character.)

And now, when I move around one side of the shape, it will move around the other.

Again, however you want to model out your torso is up to you. A lot of torso-modelling will involve making loop-cuts to define the shape of the torso. I think I'll add three sideways loop cuts to start with.


Now by moving these vertices around, I can make the body fit in with the reference image. From front view, I've only needed to move these vertices along the green Y axis for now.

By pressing the green Y button in the top-right axis compass, we can look at the character from the side.

Just moving the vertices along the red X axis, I've brought the side of the body a bit more in-line with the reference image.

You know, I've noticed the chest is meant to stick out a bit near the top, so I'll make another sideways loop cut just at the top beneath the shoulder circle and move that vertex out a bit.

Now's a good time to form the neck. If we go into face select mode (you remember where that is, right? Those three cubes in the top-left next to where it says "Edit Mode"), we can click on the top face right where the neck is and press E for extrude, to pull out a neck for our character.

It looks a bit weird from side view. Tell you what, I'll add another loop cut right between the bottom of the neck and the chest, so I can define out the neck a little bit more.

Right now the whole torso looks a bit blocky. I think I'll round it out a little by adding a vertical loop cut right down the side. Then I'll take the two edges beside the new loop cut and move them slightly inwards towards the body from front view, then scale them slightly inwards on side view.

Modelling the Shoulders

I'll select these faces and hit E for extrude to pull out the beginnings of a shoulder.

Now, we could just keep extruding out the arm from this shoulder, but arms tend to be circular in shape, and I don't feel like fiddling around with the vertices to get it looking circular right now. So I'll go up to Edit in the toolbar, go down to Preferences, and then in the Add-Ons section look up "LoopTools". Check the box next to Mesh: LoopTools to activate the handy LoopTools add-on.


Now I'll alt-click on an edge around that circle to select the whole circle, then use G for grab to move it out. Now we can see it looks more like an arm.

Now, for my purposes, that edge loop between the torso and the arm socket is a little superfluous. So I'll alt-click on that edge, right click and click "Dissolve Vertices" to get rid of that edge loop without deleting its whole shape.

Now the arm-to-shoulder part looks a lot smoother. I'll just move the armpit vertex down a little bit to even it out.


Modelling the Arm
Now - we've got a problem. I want to extrude out my arm now, but on my reference image, the side of my arm is way out in front of the character. So we're going to have to actually separate our arm, move out it in front of our character to align with the drawing, then move it back and re-attach it once we're done.


I don't feel like I need to edit the arm too much right now, so I'll just move it back into place. To do this, I'll click on the magnet symbol at the top-center of the screen to activate snapping mode. Then I'll click on the symbol next to it and change it to Vertex.

Now when I select the whole arm (which I can do by holding the mouse over it and pressing L), I can move it over towards the arm stump and all the vertices will slot into place.

Now I'll glue the arm to the body again by merging the vertices at the top together. Since I've made it so they're all touching each other, I only need to press M and then Merge by Distance to graft the arm to the body.

Modelling the Legs

Then I'll take the outer vertices and bring them upwards to form the hip area.


I'll drag them to where I want them and use S+Z+0 to straighten them out.


...and I'll add a couple more loop cuts on either side of the knee...

...so that in side view I can make the kneecap stick out a bit.

I'll add another two loop cuts above and below the knee so I can fatten out the leg a bit.


Modelling the Hands


I'll give it three sideways edge loops - one right in the middle to form the start of the fingers, one to form the finger joints, and one in the middle of the palm.

I'll straighten out the mesh a little in side view, then add three vertical loop cuts going down it, to indicate where the fingers are.

The sides of the hands are a little thick. I could use the scale tool to take the two edges and push them inward, but the result might look a little weird. Instead I'll select an edge with Alt-Click, hit CTRL+E to bring up the Edge menu, then select Edge Slide to drag the edge a little further inward.

I'll do the same for all three of the other edges on the side of the hand.

Now, still in edit mode, I'm going to add another cube and position it so I can make it into the thumb.


Now, in vertex mode, I've selected one vertex on the empty thumb face, and shift-selected the vertex on the empty hand face that it's opposite from. Then I've pressed M for merge and selected At Center to fuse the two vertices together.

I've done this four times for each vertex along the edge of both empty faces, thereby fusing the thumb to the hand.

I've hit R twice for trackball rotation just to straighten out the thumb a bit more.

Now, if you want to just give your character mitten-hands, this is as far as you need to go. However, I feel like giving my character proper fingers. So, I've taken the part of the mitten shape that represents the fingers and I've deleted it.

I've pressed F to fill in the hole left behind with a new face.

To make all the vertical loop cuts complete again, I've clicked a vertex, clicked the vertex it's facing opposite on this blank face, and pressed J for join, to create a new line between the vertices across the empty face. I've done this for all three of the side-view vertical loop cuts.
Now, selecting all of these faces, I've pressed I for inset, to create what will be the fingertips.

In the bottom-left of the viewport, a small box labelled Inset Faces will have appeared. Before clicking anything else, I'll click on that and check the box labelled "Individual". This will turn the one inset face into four separate inset faces.

Now I'll hit G to grab these faces and move them downwards, stretching out the fingers.

I've added one sideways loop cut for every finger, and can now model them to look more in line with the reference image.

Now I'm done with the hand, I want to attach it to the main body. First, I'll delete all the faces on the top of the hand.

In Object Mode, I'll grab my hand and move it over to where the bottom of the character's arm is.


I've also used K to pull out the knife tool and made some new, straighter lines to replace these ones. It's probably not the best or quickest solution, but it's the only one I could think of in the moment.

Modelling the Feet

I've used one loop cut vertically down the side to form the shape of the foot.

Since I've got two faces at the base of the character's leg, I want two faces on top of the character's foot so they fit together better this time.

I'm going to line up these vertices with each other, then go into Object mode, select the foot and the body and hit CTRL+J to join them together (again automatically reflecting the foot over to the other side)...

...and I'll use Merge by Distance in Edit Mode to close the gap between the foot and the leg again.


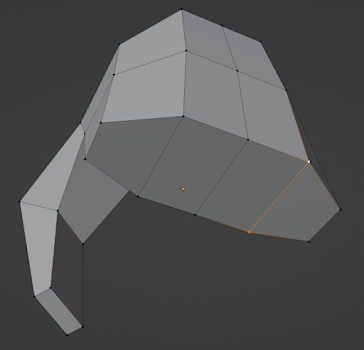
Modelling the Head
Now it's time for the final part of our character mesh, the head. In Object Mode, I'll create a new cube object and move it up to where the head will be (we could make a circle, but I'd rather keep the geometry low-poly by turning a square into a circle with a modifier).
I'm going to go to the modifiers menu and add a new subdivision surface modifier to the head-cube.

This will add more faces to the cube and turn it into a circle. Where it says "levels viewport", I'll increase it to 2, and then apply the change by hitting the little drop-down arrow and clicking Apply.

Now, I'll go into edit mode, delete one half of the circle and add in a new Y-axis mirror modifier with clipping enabled - now the head is reflected just like the body is.


And, in Object Mode, I'll join the head and body together with CTRL+J.

Now, we can see the top of the neck has four faces, so we'll need to delete these faces plus four corresponding faces on the bottom of the head (or in our case two, since our body and head are mirrored and will select the two others themselves).

This time, instead of merging the edges together, I'm going to select both of these edges, hit CTRL+E, and click on "Bridge Edge Loops". This will connect two separate objects together with new geometry, so it will look like our character has more of a neck.

With that done, all that's left now is just to clean up the body as a whole.

Once you feel happy with it, you can take a better look at how the character will appear when smooth-shaded by going into Object Mode, selecting the character and right-clicking before picking "Shade Smooth" from the menu.

And the result...

...good Lord, this is terrible. But it's a good starting point. We can add bones to a mesh like this and pose it around to create animations.


Comments
Post a Comment