I've done a few Blender tutorials before, mainly focusing on dragging out low-poly models in edit mode. However, when it comes to character creation, most people I've seen use a different method - they use sculpt mode to build up a character model like play-dough. You can go into sculpt mode with the same menu you use to access edit mode.
For this model, I've been following along Keelan Jon's video, "Blender Sculpting Tutorial for Beginners - Stylized Head Sculpt Blender Tutorial". I more or less follow that video completely wholesale, except I do something a little bit different with the hair, which I stole primarily from PixelicaCG's video "Ultimate Guide to Creating Stylized Hair in Blender", though many other tutorials use a similar method.
I'm assuming you already know the very basics of Blender: adding objects, switching between modes, modifiers and such. If not, I have another tutorial that covers most of it here.
Sculpting the Head
First things first: this here is a cube I’ve added a 2-level subdivision surface modifier to. We'll use this to make into our head.
In sculpt mode, if I drag out the window of the left-hand side menu, I can see what all the sculpting options are called.
Down here at the bottom brush-select menu, I’ve clicked “grab”.
If I click-and-drag anywhere on the mesh, I can drag out a part of it.
At the top-right are symmetry options. If I click on “Y” (the axis I’m currently facing down), I can make it so what I drag out on one side of the mesh also drags out on the other.
Press the F key to increase or decrease the radius of how much you’ll move with the grab tool.
Using the grab tool and the F key to change the brush size, I’ve made a sort of skull-like shape.
I’ve added a subdivision surface modifier with 3 levels to smooth out the mesh more.
If something’s sticking out too much for you, you can hold Shift and click to smooth over the mesh.
If you’re struggling to see the grey mesh, you can go up to the arrow in the top-right of the viewport, click on MatCap and select a new material for the mesh, so you can see it better.
Modelling the Neck
To begin the neck, I’ve gone back into object mode and added another cube with a subdivision surface modifier with three levels – but I haven’t applied it yet.
When extruding in edit mode, you can either press E to extrude out a part of the mesh… or, you can hold Ctrl, then right-click to instantly extrude the selected vertices out that way.
You can keep holding Ctrl and right-clicking to keep extruding out that part of the mesh until it forms a path.
In this way, I’ve extruded out a neck so the top extrusion goes up into the skull.
A few more edits to make the neck look more natural.
If you want to flatten out any part of the mesh, make a loop cut with Ctrl+R and place it close down to the area you want flattened.
You’ll still see some bumps and ridges on the model if you look closely. If you want rid of them, just select the mesh, right-click and select Shade Smooth.
Sculpting the Ears
I don’t tend to give my characters ears, but here I’ve made another Cube in object mode, then turned it into a sphere by giving it a subdivision surface modifier with three layers and shading it smooth.
I've used edit mode to stretch the ear out. Ears are sort-of aligned with where the jawline goes up.
Now, rather than making another ear, I want to mirror this ear over to the other side. To do this I add a mirror modifier to the ear, but then I go down to where it says “Mirror Object”. Next to it is an eyedropper symbol. If I click it and then click on my head mesh, it will mirror my ear over to the other side of the head model.
Once you’re happy with where everything is, go back and “Apply” any subdivision surface modifiers you haven’t applied yet.
If you want to fuse different meshes together into one mesh, select both of those meshes, right-click and select “Join” (or alternatively, hit CTRL+J).
Joining objects means you can move both of them around at once in object mode and edit both of them at once in edit mode… but it doesn’t actually make them both part of the same mesh.
If you want to actually fuse the meshes, you need to go into sculpt mode and use the remesh option in the top-right. Change the voxel size to something like 0.02, then hit “Remesh”.
This will fuse the neck into the head. If it looks knobbly, you might want to undo it and make the voxel size a little smaller.
Use the Shift key to smooth out the seam between the head and the neck, and to get rid of any bumpy bits that might show up on the neck.
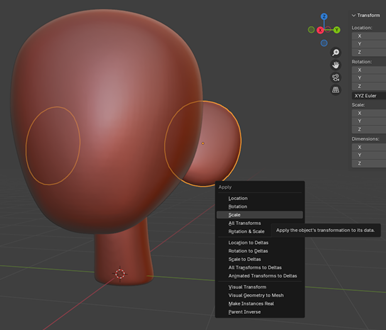
If you go back to object mode and try to go into sculpt mode with the ears now, a little yellow pop-up with appear at the bottom telling you since the object has a “non-uniform” scale, the results you get from sculpting it might be a little unpredictable. A non-uniform scale means we’ve basically scaled it out of its initial size (which we have, since it started as a cube and became an ear).
If you want to set the ear’s current scale as its new default scale, go into object mode, hit CTRL+A to open the apply menu, then click “Scale”. This makes it a little easier to work with while sculpting.
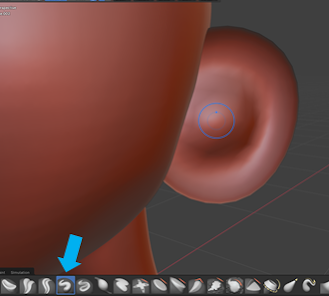
Back in sculpt mode, use the grab tool to make a little dip for the inside of the ear.
If you want to make the hole a little deeper, you can go to the Draw tool and use it to carve things out into your mesh. Click to pull the mesh outward, CTRL-click to push the mesh inward (with whatever sculpting tool you’re using, hold CTRL to make it do the opposite).
Once you’re happy with your ears, it’s time to fuse them into the mesh. Go back into object mode and apply the mirror modifier, as well as any other modifiers the ear has.
After that, it’s the same method as before – use CTRL+J to join all the meshes together, go into sculpt mode and use the remesh option, then smooth out the ear with the Shift key.
Sculpting the Face
The Draw tool can be used to poke eyes sockets into the head with CTRL+click. Make sure to remember mesh symmetry is enabled in the proper axis (you can change it in the top-right of the viewport).
Using the Grab tool, you can deform the eye sockets a little further and give the character some expression.
Now we’ve got the sockets, we can add the eyeballs. Go into object mode and add in a UV Sphere. Scale it down and move it so it pokes a little out the eye socket.
Rotate the eye along the Y axis 90 degrees (hit Y and then type 90). Now we can see where the pupil will be.
Use the mirror modifier with the head as the Mirror Object to mirror the eyeball over to the other side, giving us two eyes.
Now it’s time for the nose. I’ve added a cube with a level-3 subdivision surface modifier and positioned it where I think the nose should be.
Using object and edit mode, I’ve modelled the nose a little so it looks more natural.
After this, it’s the same story as before – apply all the modifiers on the nose, shift-click the head, CTRL+J to join, then hit the remesh button in sculpt mode.
Using Shift to smooth over the nose and any other rough areas in the mesh.
Using CTRL with the Draw tool, I’ve carved a pair of nostrils into the character.
They’re a bit hard to see from the front, so using the Grab tool I’ve pulled out the nose a little more.
In terms of adding a mouth, we can just use the Draw Sharp tool to draw one on. Draw Sharp is just like draw, except sharper and it pushes the mesh inward by default (so you hold CTRL if you want to pull the mesh outward).
To thin out the mouth a little, I’ve used the Crease Polish tool. It closes the gap between the upper and lower lip a little.
For an eyebrow, I’ve added a flat plane and positioned it where I think an eyebrow should be.
Unfortunately, we want our eyebrow to be attached to the skin of the head, not just floating around in front of it. To flatten the eyebrow against the head, we give it a Shrinkwrap modifier. Like with the mirror modifier, there’s an eyedropper symbol next to where it says “Target”. If we click it, then click on the head, the eyebrow will flatten itself up against the head.
However, it’s going to look kind of weird, because the eyebrow mesh doesn’t have a lot of points where it can curve.
In edit mode, I’ve used CTRL+R to add a few loop cuts to the eyebrow. Now back in object mode it will deform more naturally.
To make the eyebrow thicker and easier to see, we can add another modifier called the Solidify modifier. Drag the thickness bar around to make the eyebrow jut out more. The “offset” bar determines how far in or out of the head the whole eyebrow is.
Now – all in all, I’ve given the eyebrow four modifiers: the solidify modifier to thicken it, a subdivision surface modifier to smooth it out, a mirror modifier to reflect it over to the other side of the head, and a new shrinkwrap modifier to keep the eyebrow stuck to the head. However, because of the order I’ve put the modifiers in, the eyebrows look a little weird.
Modifiers are applied in the order they appear in the modifiers menu. To make to so one is applied before another, click on the symbol on the right edge of that modifier (the one with eight dots) and drag it upwards. Here I’ve put the shrinkwrap modifier before any of the others, so Blender will flatten the eyebrow against the head before doing anything else.
Modelling the Hair
Now let’s start with the hair. We’ll begin with a base from which we can put all our hair on top of. I’ve taken a UV sphere, flattened it a bit and moved it so our character is wearing it kind of like a hat.
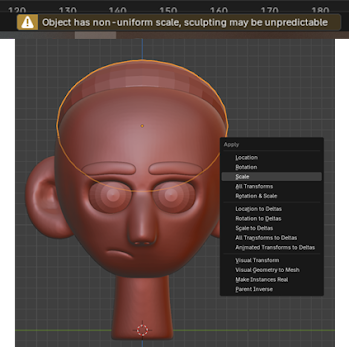
If we go into sculpt mode now, Blender will complain that we’ve scaled our object around. Go back into Object mode and hit CTRL+A to apply “Scale” to fix this problem.
In sculpt mode, I’ve used the Grab tool to sculpt the hair so it looks more natural on top of the head.
Now’s a good time to remesh the hair to give us more geometry to work with. Something like a voxel size of 0.02 should suffice.
Alternating between the Draw and Grab tools, I can sculpt out finer details for the hair such as sideburns.
In terms of creating individual strands of hair, you can just extrude some new shapes in edit mode, then join and remesh them… but most people I’ve seen do it a slightly different way to get more detail.
Using Shift+A in object mode, I’ve added in two curves – a path curve and a circle curve.
I’ve moved them so the circle is facing down the axis I’m looking at. The line we’ve made is going to be the hair strand. Meanwhile, we’re going to use the circle to put some lumps and bumps on the hair strand.
Click on the line, then go into its Data menu (the symbol looks like a green curved line with two dots on either end). Click on where it says “Geometry”, then go down to “Bevel”. If you switch the mode to “Object”, you’ll see another eyedropper tool.
Click the eyedropper tool, then click the circle. You’ll see the line becomes a tube.
Now, here’s the interesting thing: if you go click the circle and go into edit mode, then start dragging around the points, the tube itself will change its shape to match the circle. To add new points, shift-click two points, right click, then press “Subdivide”.
On the top and bottom sides of the circle, I’ve added some random lumps and bumps. You can see them reflected on the hair strand below.
Now I’ve gone into edit mode for the hair strand itself. Where one end of the line is, I’ve clicked it, then pressed Alt+S. This allows me to scale down the hair here to a small size (it won’t work just pressing S because there’s only one vertex). I’ve used the same method to change the sizes of the points all along the hair strand so it looks more natural.
Back in object mode, I’ve used Shift+D to duplicate this hair strand, then I’ve moved the new hair strand over to where I think it ought to be on the character’s head.
Using the grab tool in edit mode, I can move the strand of hair around and shape it into a piece of hair coming off the character’s head.
You can use E for extrude to make the hair longer, and if you want to give the hair a twirl, you can press CTRL+T to twist the hair strand.
If you want to make another strand of hair, go back into Object mode, hit Shift+D to duplicate the hair, then go back into Edit mode and move around the vertices of the new hair.
Coloring the Model
When it comes to coloring in the model, sculpt mode has its own paint tool in the left-hand menu. Click on the mesh to color it in. You can change the size of the paint brush with F, and you can change the color and properties of the paint in the top toolbar. If you hold shift, you can soften up colors so they blend into each other.
I’ve painted the character with a skin tone I think looks good, but you might want to change the MatCap mode back to the default to make sure - the rusty red MatCap makes the color look a lot darker than it actually is.
However, what I haven’t done is actually color in the character. If I press Z and go into Material Preview or Rendered mode, the model will just show up blank.
Back in object mode, in the head’s object data tab (the green symbol), there’s a segment called Color Attributes. If I open it up, one will be there – this is the color that was automatically generated by our painting the model. We need to find some way to turn this color into a material.
If you go up to the very top-right edge of the viewport and drag it out, you can add another window into the viewport. By clicking the Editor Type icon in the window’s top-left, you can change the editor type of that window – in this case, I want to change it to a Shader Editor.
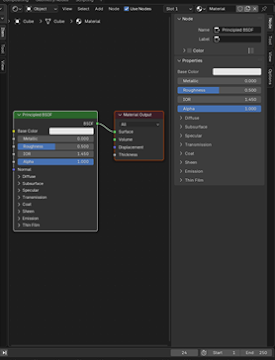
Right in the middle is this green box. This box represents the material currently on the model – in this case the dull grey default material.
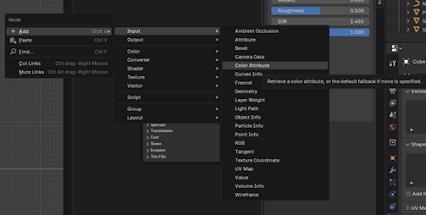
To change the material’s color, we need a Color Attribute node. Hit Shift+A to add in a new node. Go into Input, then click Color Attribute.
A new red box will appear. If you click on the text box at the bottom of it, you’ll see you can select the color that was in our model’s object data tab – the color that we painted onto it.
By where it says “Color”, there’s a yellow dot. If you click-and-drag it, a yellow wire will appear. If you attach this wire to the other yellow dot, next to where it says “Base Color” in the green box, the Color Attribute we’ve created will override the Base Color, turning it into the color we painted.
You don’t have to paint every material onto the mesh like before – only if you know there’s going to be complicated blending or suchlike. In Object Mode, you can just go to the mesh’s Materials menu (with the symbol of the red beach ball) and add new materials in that way. You have options here such as Metallic, that makes the mesh more metal-y, and roughness, which makes the mesh more or less smooth and shiny (so low roughness would be good for things like eyes).
To give two objects the same material, click a blank object, then shift-click a materialled object, then hit Ctrl+L for link and select “Link Materials”.
Click the plus button to add more than one material to the same object.
To change the color of individual parts of a mesh, go into edit mode, select the parts of the mesh you want to change the color of, then click “Assign” in the materials menu to change them to the currently-selected material.
These are the very basics of sculpting a character in Blender... or at least their head. I assume it's a very similar story for sculpting the rest of the body as well. As far as I know, when it comes to adding clothes to a character, you take part of the model in edit mode (like the torso or legs), duplicate it, separate the duplicate into its own object, add a solidify modifier to bulk it out, then start sculpting it out or giving it loop cuts so it becomes a shirt or a pair of pants.
One more thing - this model, by itself, can't be given a skeleton and animated because there's just too many vertices it can't cope with. If you want to animate it, you need to make a simpler low-poly version of the model via retopology, then use a normal map to "bake" the high-poly model on top of the low-poly one. But that'd take another tutorial to explain. And I haven't watched that tutorial yet.









Comments
Post a Comment