Rigging a Character for Animation in Blender
Now we've made a character in Blender, we can start adding bones to them in a process called "rigging". We can move around these bones to move around parts of the character's body. We animate our character by moving these bones around into a pose, saving the pose then moving the bones again to create another pose. We can put these poses into a precise order to make them play one after the other, creating an animation.
First of all, we need to add bones to our character. In Object mode, hit Shift+A to bring up the Add menu, go down to "Armature" (an "armature" is what Blender calls a skeleton), then select "single bone" to add a bone.

(Blender does come with a pre-made skeleton for human animations, but I haven't got the hang of working it yet. Plus, the template is designed to be facing down the Y axis - I made my character facing the X axis, so it won't attach the bones to my mesh so well. Unless I, y'know, rotate the mesh around so it's facing the Y axis. But I'll stick with making my own skeleton for now.)

A bone in Blender is a weird spiky thing that spawns at the 3D cursor. If you go into Edit mode and click on one of the spheres at either end of the bone, you can move them with G for grab to stretch the bone around.

This first bone is going to be my character's pelvis bone. With the whole bone selected, I'll hit G for grab to move it upwards into the character's body...

...and now I can't see it, since the character mesh is in the way. I could hit the Z key to activate wireframe mode so I can see the bones, but there's another way.
In the right-hand inspector menu, there's a tab for "Data" that looks like a green stick person. If I click it and look under "Viewport Display", there's a check box labelled "In Front". This makes it so the object (in this case, the bone) appears to be in front of other objects, even when it's inside of them.


Now I've extruded out a third bone. This one goes all the way to the bottom of the character's neck. I've called it the "ribcage".


Finally, I've extruded and named by neck bone, which goes up to the top of the neck.

Now's a good time to make sure all the bones follow along the mesh from side view. I've added a slight bend to them, since spines tend to bend a little when we're standing up.

Rigging the Arm

Instead, I want to duplicate one of these bones with Shift+D and drag it over to form the start of the arm. Which bone do I want to duplicate? Well, I want my arm to be attached to the ribcage. What other bone do I have already that's attached to the ribcage? The neck - so I'll select the neck, hit Shift+D to duplicate it, and move it down to the start of my arm.


Since this is the shoulder bone, I'll name it so, and since it's the character's left shoulder, I'll put .L at the end to name it "Shoulder.L". This is Blender's naming convention for left and right bones - when we go on to flip the names, Blender will automatically change this ".L" to ".R" for right.

Now to extrude out the left arm. I've extruded one bone down to where the elbow is and called it "UpperArm.L", then I've extruded another down to where the hand begins and called it "LowerArm.L".

Now I've extruded a bone for the palm of my hand, going down to where the fingers start, and called it Hand.L.

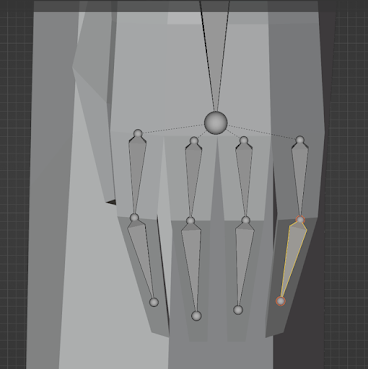
Rigging the Fingers
Now to begin forming the fingers. Obviously, if I were to just try and extrude them all from the bottom of the hand bone, the result would look weird. Instead, I'll add a new bone with Shift+A, then move it into the position I want it to be in.


I can hit Shift+D to duplicate this connected finger bone three more times to form the rest of the fingers.


Rigging the Leg

The upper leg goes down to where the knee is, the extruded-out lower leg goes down to the start of the foot. Remember to name them, and since they're on the left side of our character's body, put ".L" at the end of their names.

My feet here are quite simple - one extrusion down for the foot bone, another one out to the toes for the toe bone.


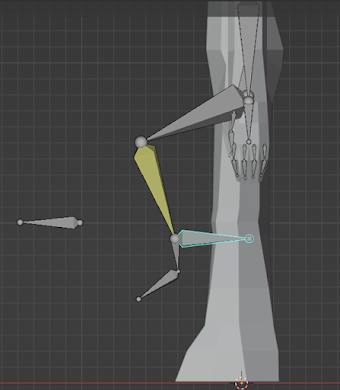
Making IK Bones


Now I'm going to go into Pose mode. This can be accessed from the top-left of the screen.


Now try clicking on the backwards-ankle bone and hitting G to grab it and move it around. The whole leg bone structure should now be moving around with it (we'll make the mesh move with it later).
Mirroring the Bones

Now, to duplicate the bones, I'll go into Edit mode, select all the bones on the arm and the leg, and hit shift-D to duplicate. Then, to flip them, I'll hit S for scale, Y to lock the scaling to the Y axis, then type "-1" on my keyboard. That's Shift+D, S for scale, lock to the Y, then -1.

This will place the dupliacted bones on the opposite side of the body. Before you click anything else, at the bottom of the screen will be a box, and at the top of it will be a check box for "Flip Names". Check this box, then click on any of the character's new bones to see what happens.

If you look at their names in the side inspector menu, you can see that the .Ls have all been changed to .Rs. Now Blender can tell which arm and leg bone is for the left and which is for the right.


Adding the Rig to the Mesh
Now go into pose mode and try moving some of the bones around. If all goes well, the mesh should be carried along with the bones as you move them.

To undo any movements in pose mode you've made, you can right-click and go down to "Clear User Transforms" to restore the bones to their original positions.

Weight Painting

We can fine-tune these deformations with weight paint mode. Weight paint mode allows you to select a bone, then paint in the areas of the mesh that you want that bone to move.

The character mesh should turn blue. Hold down CTRL and click on any bone to bring up its weights.

You'll see the part of the mesh around the selected bone turn different colors. These colors indicate how much of that mesh will move along with that bone. The red part of the mesh will move directly wherever the bone goes, while the blue parts of the mesh won't be influenced by that bone at all. The yellowy-green parts are in between the red and blue areas, and will move slightly with the bone but not as much as the red area.

Try using G for grab to move around this bone, to see which parts of the mesh move with it.

You can click on the mesh to paint weight on it. At the top of the screen are three bars, and one of them says "Weight". If you drag it all the way to the right, you'll increase the intensity of the weight painting and turn anything you click on red, meaning it will move along with the currently-selected bone.

If you turn this bar the other way, all the way to zero, you'll paint the mesh blue by clicking on it, meaning less of it will be impacted by the current bone.

Now, I'm going to be honest - this is about as much as I know about weight painting. There's probably a much easier way of assigning specific areas of the mesh to specific bones - selecting all the vertices in that area and filling them all in red, for instance - but I don't know how to do that yet. So, my work here is really just a lot of guessing and moving the mesh around to see which bits look too weird when they're bent or moved.


If you want to reset your pose, you can go back into pose mode by selecting the armature in object mode, then select all the bones with A, right-clicking and selecting "Clear User Transforms".


In the new menu that appears, click on the "Tools" tab, go down to where it says "Symmetry", then tick the box that says "Mirror Vertex Groups". Clicking the X, Y or Z buttons below it determines which axis the weight painting will mirror itself on.

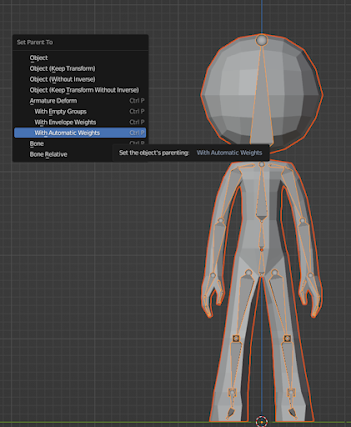
Attaching Clothes to the Rig

In object mode, click on the clothing, then shift-click on the armature. Hit CTRL+P to parent and select "with automatic weights". This will attach the shirt to the armature just like the mesh, so it will move around when you move the bones around...

...but it will do it quite weirdly.

You could go into weight-paint mode to rectify this deformation problem, but I think it would be easier to just copy the weight-painting already on our character over to the shirt. So, I'll hit CTRL-Z a few times to undo back to before we attached the bones to the shirt, click the shirt, shift-click the bones, hit CTRL+P for parenting, and this time select "with empty groups". This will make it so the shirt starts with no weight painting (i.e. completely blue).

Now, click on the body mesh, shift-click on the shirt, then go from object mode into weight paint mode. This should turn the shirt blue.

Somewhere in the top-left of the screen will be a button called "Weights". Click on it and select "Transfer Weights" from the drop-down list. This will copy the weight painting from the body mesh over to the shirt mesh.

In the box that pops up at the bottom-left of the screen, click by where it says "Source Layers Sel..." and change it from "Active Layer" to "By Name".

Now the shirt mesh follows along the armature just like the body mesh does.

That's enough about rigging for now. Next time we'll look at pose mode in more detail and talk about turning our poses into keyframes to create animations.


Comments
Post a Comment