Animating a Walk Cycle for a Character in Blender
We've made a character model in Blender, and we've added bones to it so we can move it around. Now we can start moving this character into poses which we can save to create animations.
I'm going to start with a simple bit of animation - the character walking forwards. This type of animation is called a "walk cycle", and if you look up walks cycles online, you'll find lots of reference images that show what poses we'll create and what order they'll go in. I often take cues from this image by idleworm.com, for example, since it has the cartoony look I'm going for:

We only need to worry about the first five poses for Blender. Everyone seems to have different names for what these poses are - I like to call them the left-heel, the stomp, the pass, the spring and the right-heel.
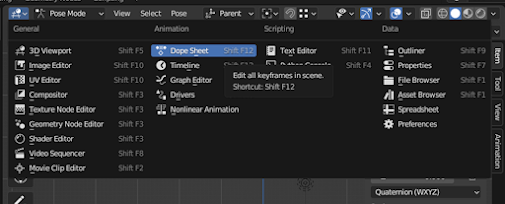
In Blender, we save our poses as animation keyframes in the dope sheet window. To open up a new viewport window, move the cursor up to the very top-right of the viewport, until it turns into a four-lined reticule.

When you see this reticule, click and drag to the left and a new viewport window will open up.

In this new viewport, click on the editor mode icon in the very top-left (it looks like a ball floating above some lines), and change the editor mode to "Dope Sheet".
Inside this dope sheet, there will be a timeline. If we put our character into a pose and save that pose somewhere on the timeline, the character will automatically move into that pose when the timeline plays.
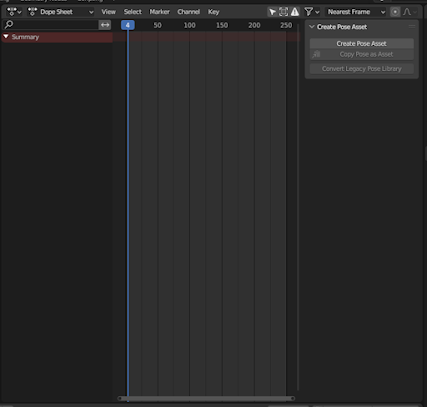
There is another timeline already present in the Blender scene you can use. It's way at the bottom underneath the viewport, hidden from view. If you take your cursor down until it turns into two opposing arrows, then click and drag, the timeline will appear from out the bottom. It will have the same values as whatever's going on in the dope sheet timeline.

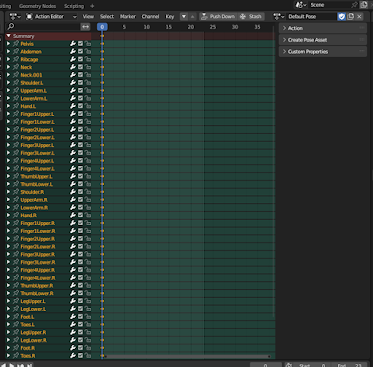
At the top of the dope sheet, where it says "Dope Sheet", click on it and change it to "Action Editor". This will allow us to save strings of poses as one "action".

At the top-right of the dope sheet, click where it now says "New" to create a new action.

I've re-named this action "Walk". Now we can start animating our character over in the pose mode viewport.

The Heel

Now let's actually pose our character. Click on any of the bones and hit G for grab to move them around, then click again to set them in that area.


...now I'm starting to see where I need to do some better weight painting. You can freely chop-n-change between all the different modes if you feel you need to make some alterations (remember, in Object mode, click the bones first, then shift-click the body to access weight painting mode).


It looks a little out-of-whack from the front, so I've made some alterations in front and back view to bring the legs a little closer together.

Now I've moved one arm a little out in front and the other further back. When you're walking, the arms tend to sway in the opposite direction of the legs - so if your left foot's forward, your left arm will be back.

I've rotated their ribcage a little away from the front arm, so it looks like they're swaying...


Finally, I've bent the arm out front slightly inward so it looks like they're swinging it a little in front of their body.

And I think that will do for our first pose. I could pose the finger bones and clench the hands into fists, but I want to make this quick.

A new menu will open up with some options to choose from. I'm going to pick "Location and Rotation", so it will save the location and rotation of all my bones as keyframes (if I had scaled anything, I'd want to pick "Location, Rotation & Scale" instead).


The Reverse-Heel


Once again, I'm going to right-click, select Insert Keyframe, select Location and Rotation, and new keyframes for this pose will appear at the playhead's position in the dope sheet.

Now, try dragging the playhead between these two keyframes and see what happens.

The Pass

Then I'll move the character's right leg a little upwards so it looks like it's swinging past.

I'll raise the pelvis a little, then hit A to select all the bones, right-click, insert keyframes and make it location and rotation. Now the walking animation should look a little more natural.

The Stomp

Meanwhile, the character's pelvis is at its lowest point in the cycle.

The back leg, meanwhile, trails a little further back, with only the toes just about touching the floor.

This looks good. We'll hit A again, then right-click to add another Location and Rotation keyframe.

The Spring


You know the drill - A to select all the bones, right-click to insert a keyframe, then location and rotation.

Mirroring the Second Step

Now hit Ctrl+C to copy these keyframes. Since when we paste them they'll appear at where the playhead is, let's move the playhead up to the final keyframe at frame 13.

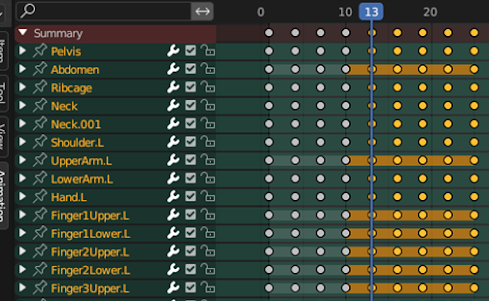
So now, when we play the animation with the space bar, the character walks in a natural-looking way... for about a second, then they just freeze in mid-stride. Over on the right-hand side of the bottom timeline, there's two buttons - one that says "Start", with the frame where the animation starts playing, and one that says "End", which is the frame where the animation stops playing.

250 frames is a little bit long for our animation (for reference's sake, it's about 30 frames per second), so I'll change the end frame value to 24 (it's alright to cut off the last keyframe since it's a repeat of our first keyframe).


Now, the animation stutters a little when it repeats, so I'm going to select all the keyframes with A and use G to grab them and move them so the first keyframe starts on frame 0. Then I'll decrease the end point to 23.

The Graph Editor

A bunch of line graphs will appear that show how the character's bones move across the animation on the X, Y and Z axes. I'm not going to pretend to understand any of it, but I do know that if you click where it says "Key", then go up to "Interpolation Mode", you can change the way the character moves between keyframes.

- "Bezier" is the mode that's currently selected. This makes the character move smoothly between the keyframes, so it looks as realistic as possible.
- "Linear" makes the character's body parts all move at the same speed between the keyframes. This makes them look like they're a robot.
- "Constant" just snaps from one keyframe to the next and doesn't have the character's body move between them. This can produce a stop-motion effect.
Saving the Animation

The shield button is the "Fake User" button - pressing this button just makes absolutely sure that Blender saves this animation. As it is now, Blender will only save the animation if it's being used somewhere in the scene. If it's not being used on any object by default, then if I were to close this Blender project and open it again, the walk animation would disappear. So it's best we make sure this shield button is pressed (turning it blue with a tick) so the animation stays in the Blender file even if it's not currently being used.

The button next to it with two files is the "Create New Action" button, which is what you press whenever you want to add and name a new animation. The button next to that is the "Unlink Action" button - it doesn't delete the animation, it just takes you out of editing it. You can access it again in the "Browse Action" button to the left of the animation's name.

In the dope sheet, I've used A to select all the keyframes and hit "Delete" to remove them. Then, in pose mode, I've hit A to select all the bones, and pressed Alt+G, Alt+R and Alt+S, to restore the character's bones back to where we originally put them.

Finally, with the playhead on frame 0, I've right-clicked in pose mode to insert a new keyframe, and selected Location and Rotation.
I can switch between these two animations in the top-right of the dope sheet if I want to see the character walk again.

By the way, you remember having to draw this character first to create the model for them? Now that you've made a poseable model, you never have to remember what your character looks like. You can use Blender to create little scenes you can springboard into drawings, and it'll give you a proper sense of proportion.

And before anyone starts accusing me of cheating or tracing - I've seen people on ArtStation do this! A lot of professionals use Blender to create models for characters and objects they've drawn, so they can pose them in a scene they can then copy into a perspective drawing. ...Fine, maybe they don't trace it one-to-one, but being able to make your own custom reference images like this is a godsend if you struggle with perspective and foreshortening like I do.


Comments
Post a Comment